GitHub Copilot CLI — Beginner Study Guide
🤖 GitHub Copilot CLI
Beginner Study Guide
From zero terminal experience to confident Copilot CLI user — a complete hands-on masterclass.
| Level | 🟢 Beginner — no coding experience required |
| Time | ~3 hours (work at your own pace) |
| Modules | 17 + 1 bonus with hands-on exercises |
| Version | 1.0 — April 2026 |
✍️ Susanth Sutheesh — A Guide to Cloud & AI
© 2026 Susanth Sutheesh — A Guide to Cloud & AI
🎯 Scenario — Meet Alex
Alex is an IT administrator at a mid-sized company called Northwind Traders. Every day, Alex manages Microsoft 365 users, Azure resources, and handles tickets — all through the GUI. Clicking through the Azure Portal, scrolling through the M365 Admin Center, right-clicking through File Explorer.
It works. But it's slow. Repetitive. And when Alex needs to do the same thing across 50 users or 20 VMs, it takes forever.
One day, Alex's colleague says: "Have you tried GitHub Copilot CLI? It's like having an AI assistant right inside your terminal. You just tell it what you want in plain English and it does it."
Alex is skeptical: "A terminal? Isn't that for developers? I've never even opened one."
This study guide follows Alex's journey — from opening a terminal for the very first time to using Copilot CLI as a daily productivity powerhouse. By the end, Alex wonders how they ever worked without it.
You are Alex. No coding background needed. No developer experience assumed. Just follow along, step by step.
📋 Prerequisites
Before starting, make sure you have the following ready:
| # | Requirement | How to Get It | Why You Need It |
|---|---|---|---|
| 1 | Windows, macOS, or Linux | You likely already have one of these | Copilot CLI is cross-platform |
| 2 | Internet connection | Your regular Wi-Fi or ethernet | Copilot CLI is cloud-based — it sends your questions to GitHub's servers |
| 3 | GitHub account | Free at github.com/signup | Your identity — Copilot CLI needs to know who you are |
| 4 | GitHub Copilot subscription | Any plan works — even the free tier | The AI engine that powers everything |
| 5 | Windows Terminal (Windows) or Terminal (macOS) | Windows: Microsoft Store. macOS: built-in (search "Terminal" in Spotlight) | A clean terminal experience |
This guide covers both Windows and macOS
The installation steps differ slightly between Windows and macOS — we'll show both. After installation, everything works the same regardless of your operating system. The commands, conversations, and features are identical.
Don't have a Copilot subscription yet?
GitHub offers a free tier with 50 premium requests per month. That's more than enough to complete this entire study guide. You won't need to pay anything. Sign up at github.com/features/copilot.
What about the different Copilot plans?
We'll cover plans and pricing in detail in Module 13. For now, the free tier is all you need to follow along. You can always upgrade later.
🏁 What You'll Achieve
By the end of this study guide, you will be able to:
- [x] Explain what a terminal is and why IT professionals should care
- [x] Understand how Copilot CLI sits on top of PowerShell and the terminal
- [x] Install and launch GitHub Copilot CLI on your machine
- [x] Have productive conversations with an AI that actually runs commands
- [x] Navigate your file system confidently using 5 commands
- [x] Use three different communication styles (plain English, slash commands,
!prefix) - [x] Manage sessions — save your work, resume past conversations, name sessions
- [x] Set up custom instructions so Copilot remembers your preferences forever
- [x] Understand the context window and manage it proactively
- [x] Choose the right AI model for different tasks
- [x] Understand premium request costs and manage your monthly budget
- [x] Use safety features and control exactly what Copilot can access
- [x] Reference files directly with
@for precise answers - [x] Connect Copilot to cloud services like Azure and M365 through skills and MCP servers
- [x] Apply everything in a real-world daily workflow scenario
🗺️ Module Overview
Here's the full journey. Each module builds on the last — but if you already know the basics, feel free to skip ahead.
├── Module 1: What is a Terminal?
│ ├── GUI vs CLI — two ways to use a computer
│ ├── Why IT professionals should care about CLI
│ └── The restaurant analogy
│
├── Module 2: What is GitHub Copilot CLI?
│ ├── The building analogy — how the layers stack
│ ├── What makes it special (it can TALK and DO)
│ ├── How the AI learned all those commands
│ └── Internet requirement
│
├── Module 3: Copilot CLI vs ChatGPT
│ ├── Detailed side-by-side comparison
│ ├── The mechanic analogy
│ └── What Copilot CLI CANNOT do
│
├── Module 4: Installing Copilot CLI
│ ├── What is winget?
│ ├── Step-by-step installation
│ └── First-time authentication
│
├── Module 5: Your First Conversation
│ ├── Launching Copilot CLI
│ ├── Your first question in plain English
│ ├── What happens behind the scenes
│ └── The "aha moment"
│
├── Module 6: Navigating the File System
│ ├── Your computer's file system as a building
│ ├── 5 essential navigation commands
│ ├── Absolute vs relative paths
│ └── Hands-on: navigate your own file system
│
├── Module 7: Talking to Copilot — Plain English
│ ├── How to ask effective questions
│ ├── Vague vs specific prompts
│ └── Magic phrases that get better results
│
├── Module 8: Slash Commands & the ! Prefix
│ ├── Complete slash command reference
│ ├── The ! bypass trick
│ └── Hands-on: try all three styles
│
├── Module 9: What is a Session?
│ ├── The phone call analogy
│ ├── Resuming past sessions
│ ├── Naming sessions
│ └── Session exit summaries
│
├── Module 10: The Passport Strategy — Custom Instructions
│ ├── Why sessions are temporary but instructions are permanent
│ ├── What to put in your instructions
│ ├── How to update them
│ └── The three-layer memory model
│
├── Module 11: The Context Window — Your Whiteboard
│ ├── What's on the whiteboard
│ ├── Traffic light system
│ ├── /compact, /clear, /new — when to use each
│ └── 5 strategies to manage your whiteboard
│
├── Module 12: Choosing the Right AI Model
│ ├── The chef analogy
│ ├── Model comparison table
│ ├── Switching models with /model
│ └── Best practices
│
├── Module 13: Premium Requests & Budget Management
│ ├── Plans and pricing
│ ├── Model multipliers — the hidden cost
│ ├── What happens when you run out
│ └── 6 budget tips
│
├── Module 14: Safety & Permissions
│ ├── 4 layers of protection
│ ├── The approval prompt
│ ├── Directory access and /add-dir
│ └── What Copilot can never do
│
├── Module 15: Referencing Files with @
│ ├── How @ works
│ ├── File types Copilot can read
│ └── Hands-on: reference a file
│
├── Module 16: Skills, Plugins & MCP Servers
│ ├── The phone apps analogy
│ ├── What each type does
│ ├── Managing extensions
│ └── Brief intro to agents
│
├── Module 17: Putting It All Together — Alex's Daily Workflow
│ ├── Alex's morning routine with Copilot CLI
│ ├── Real-world scenarios
│ └── Before vs after comparison
│
└── ⭐ Bonus Module 18: Work IQ — Workplace Intelligence
├── What is Work IQ?
├── Admin setup (Entra app consent, permissions, licensing)
├── Querying emails, meetings, documents, Teams, people
├── Real scenarios with examples
├── Privacy & security
└── Tips, best practices & limitations
Module 1: What is a Terminal?
Before we touch Copilot CLI, we need to understand where it lives. Copilot CLI lives inside something called a terminal. So let's start there.
📑 In This Module
Two Ways to Use a Computer
You've been using computers for years — probably decades. But you've almost certainly been using them in only one way: through a GUI (Graphical User Interface). That means clicking icons, dragging windows, selecting from dropdown menus, and scrolling through settings pages.
There's a second way: the CLI (Command Line Interface). Instead of clicking, you type commands as text. Instead of navigating menus visually, you tell the computer what to do in words.
Both ways achieve the same result. They're just different methods of communicating with your computer.
Real-World Analogy: The Restaurant 🍽️
Imagine you're at a restaurant.
GUI = Being a customer in the dining room. You look at the menu, point to what you want, and the waiter brings it to you. It's easy, visual, and you don't need to know how the kitchen works. But you can only order what's on the menu.
CLI = Being in the kitchen. You can cook anything — not just what's on the menu. You have full access to every ingredient, every tool, every technique. But you need to know what you're doing (or have someone helping you).
Copilot CLI = Having a master chef standing next to you in the kitchen. You say "I'd like a mushroom risotto" in plain English, and the chef knows exactly which ingredients to grab, which pot to use, and how long to cook it. You get the full power of the kitchen without needing to memorise every recipe.
The Comparison
| GUI (What You Know) | CLI (What You're Learning) | |
|---|---|---|
| How you interact | Click, drag, point, scroll | Type text commands |
| Speed | Good for browsing and exploring | Much faster for repetitive tasks |
| Automation | Very hard to automate mouse clicks | Easy — write a script, run it 1,000 times |
| Precision | Limited by what the menu/UI shows you | Full control over every parameter |
| Doing 1 thing | About the same speed | About the same speed |
| Doing 50 things | Click, click, click... 50 times 😩 | One command, done ✅ |
| Learning curve | Easy to start | Steeper at first, but pays off quickly |
Why Should IT Professionals Care?
You might be thinking: "I've done fine with GUIs for 15 years. Why change?"
Here's the honest answer: GUIs don't scale.
Consider this scenario:
Your manager asks you to disable the accounts of 50 employees who are leaving the company this Friday.
With the GUI: You open the M365 Admin Center, find each user, click their profile, click "Block sign-in", confirm, and repeat. 50 times. That's easily 30-45 minutes of clicking.
With the CLI (and Copilot): You type: "Disable sign-in for all users in the 'Departing Employees' group." One command. Done in seconds.
That's the difference. For one user, the GUI is fine. For 50 users, you want the CLI.
You don't have to choose one or the other
Most IT professionals use both. GUI for exploring and understanding. CLI for executing and automating. Copilot CLI makes the CLI side much easier because you don't need to memorise commands — you just describe what you want.
What Does a Terminal Actually Look Like?
A terminal is simply a window with a text cursor. No icons, no buttons, no menus — just a blank screen waiting for you to type something.
On Windows, the best terminal experience is Windows Terminal (available free from the Microsoft Store). It's modern, supports tabs, and looks much nicer than the old Command Prompt window.
When you open Windows Terminal, you'll see something like this:
That's the prompt — it's telling you:
PS= You're using PowerShell (the language/engine)C:\Users\Alex= Your current location in the file system>= It's ready and waiting for your input
That's it. Nothing scary. It's just a blank page waiting for instructions.
✅ Module 1 Checkpoint
At this point, you should understand:
- [x] There are two ways to use a computer: GUI (clicking) and CLI (typing)
- [x] The CLI is faster for repetitive tasks and automation
- [x] A terminal is just a window with a text cursor
- [x] You don't have to choose — most professionals use both
- [x] Copilot CLI makes the CLI approachable because you type plain English, not memorised commands
Module 2: What is GitHub Copilot CLI?
Now that you understand what a terminal is, let's talk about what makes GitHub Copilot CLI special — and how it fits into the picture.
📑 In This Module
The Building Analogy
Think of your computer as a building with floors. Each floor serves a different purpose, and they stack on top of each other:
┌───────────────────────────────────────────────────┐
│  YOU (typing commands & questions)                 │
├───────────────────────────────────────────────────┤
│  GitHub Copilot CLI (AI buddy)          ← Floor 3 │
├───────────────────────────────────────────────────┤
│  PowerShell (language/engine)           ← Floor 2 │
├───────────────────────────────────────────────────┤
│  Terminal (window/screen)               ← Floor 1 │
├───────────────────────────────────────────────────┤
│  Your Computer (Windows)             ← Foundation  │
└───────────────────────────────────────────────────┘
Let's break down each floor:
| Floor | What It Is | What It Does | Analogy |
|---|---|---|---|
| 🏗️ Foundation | Your Computer (Windows) | The operating system — manages hardware, files, memory, everything | The building itself — walls, plumbing, electricity |
| 1️⃣ Floor 1 | Terminal (Windows Terminal) | A window that displays text. That's ALL it does — it doesn't process commands, it just shows them | A glass window — you can look through it, but it doesn't do anything on its own |
| 2️⃣ Floor 2 | PowerShell (the engine) | The language that actually understands commands and carries them out | The staff who speak English — they understand instructions and can act on them |
| 3️⃣ Floor 3 | Copilot CLI (AI assistant) | An AI that translates your plain English into PowerShell commands, runs them, reads the output, and explains results | A genius manager who translates your wishes into staff instructions |
Why does this matter?
When people say "I opened the terminal and typed a command," they're actually using three layers at once — the terminal (window), PowerShell (engine), and now Copilot (the AI brain). Understanding this stack helps you troubleshoot when things don't work as expected.
For example: if Copilot isn't responding, the problem might be on Floor 3 (AI service down), Floor 2 (PowerShell error), or Floor 1 (terminal crashed). Knowing the layers helps you pinpoint where things went wrong.
What Makes Copilot CLI Special?
Most AI chatbots can only talk. They can explain concepts, suggest commands, and write code — but they can't actually do anything on your computer. You'd have to copy their suggestion, paste it into your terminal, and run it yourself.
Copilot CLI is different. It can talk AND do:
| What It Can Do | Example |
|---|---|
| 💬 Answer questions | "What does the netstat command do?" → Explains the command in plain English |
| ⚡ Run commands for you | "List all files modified in the last 24 hours" → Figures out the PowerShell command, runs it, shows the results |
| 📂 Read your files | "Read the config.json file and explain each setting" → Opens the file, reads it, gives you an explanation |
| ✏️ Edit your files | "Add a new line to the end of my notes.txt" → Actually modifies the file on disk |
| 🏗️ Build things | "Create a PowerShell script that checks disk space on all drives" → Writes the script, saves it, and can run it for you |
| 🔍 Search | "Search this folder for any file containing the word 'password'" → Searches recursively and reports what it found |
| 📚 Teach | "Explain this error message like I'm new to PowerShell" → Breaks it down in simple language |
| ☁️ Connect to cloud services | "List all VMs in my Azure subscription" → Connects to Azure and retrieves the data |
| 🌐 Search the web | "What are the latest features in Windows Server 2025?" → Searches the internet and summarises findings |
The key insight
You don't need to memorise commands. You describe what you want in plain English, and Copilot figures out how to do it. It's like having a senior engineer sitting next to you who never gets annoyed at questions.
How Did the AI Learn All These Commands?
You might wonder: "How does Copilot know all these commands? Did it practice using a computer?"
No — it didn't learn by "using" a computer. Here's what actually happened:
- 📚 Trained on billions of documents — Microsoft documentation, Stack Overflow answers, GitHub repositories, PowerShell help files, Azure docs, tutorials, and more
- 🧠 Learned patterns — After reading billions of examples, the AI learned that when someone says "list files," the right command is usually
Get-ChildItem(PowerShell) orls(Linux) - 👨🏫 Fine-tuned by humans — Engineers reviewed outputs, corrected mistakes, and refined the AI's behaviour
- 🔄 Continuously improved — The model is regularly updated with new knowledge
Analogy: The Medical Student 🏥
A doctor doesn't learn medicine by getting sick themselves. They learn by reading thousands of textbooks, case studies, and research papers. Then they practise under supervision until they're good enough to work independently.
Copilot learned commands the same way — by reading billions of examples of how commands are used, not by "using" a computer itself.
Does it always get it right? No. Like any professional, it can make mistakes — especially with unusual or very specific scenarios. That's why Copilot always asks for your permission before doing anything risky.
The Internet Requirement
One thing you must know upfront: Copilot CLI needs the internet. Always.
sequenceDiagram
    participant You
    participant Terminal as Windows Terminal<br/>(your computer)
    participant Internet as 🌐 Internet
    participant GitHub as GitHub Servers
    participant AI as AI Model<br/>(Claude/GPT)

    You->>Terminal: Type a question
    Terminal->>Internet: Send securely
    Internet->>GitHub: Deliver to GitHub
    GitHub->>AI: Process request
    AI-->>GitHub: Generate response
    GitHub-->>Internet: Send back
    Internet-->>Terminal: Deliver response
    Terminal-->>You: Display answer ✅
Your question travels from your terminal → through the internet → to GitHub's servers → to an AI model → and back. This round trip takes 2-5 seconds for most requests.
No internet = no Copilot
If your Wi-Fi drops, VPN disconnects, or you're on a plane without internet, Copilot CLI stops working. Your terminal and PowerShell still work — only the AI layer (Floor 3) needs connectivity.
✅ Module 2 Checkpoint
At this point, you should understand:
- [x] Your computer is like a building: Windows (foundation) → Terminal (floor 1) → PowerShell (floor 2) → Copilot CLI (floor 3)
- [x] Copilot CLI can talk AND do — it runs commands, reads files, edits files, connects to cloud services
- [x] It learned by reading billions of documents, not by "using" a computer
- [x] It always needs an internet connection
- [x] Your question takes a 2-5 second round trip to GitHub's servers and back
Module 3: Copilot CLI vs ChatGPT
This is the question everyone asks: "How is Copilot CLI different from ChatGPT? Can't I just use ChatGPT?"
Great question. Let's break it down honestly.
📑 In This Module
The Side-by-Side Comparison
| Feature | ChatGPT (Web/App) | Copilot CLI (Terminal) |
|---|---|---|
| Where it lives | Browser tab or mobile app | Inside your terminal, right next to your work |
| Can run commands | ❌ No — can only suggest commands | ✅ Yes — actually executes them on your machine |
| Can read your files | ❌ Only if you copy-paste content into the chat | ✅ Yes — reads files directly from your file system |
| Can edit your files | ❌ No — shows you what to change, but you do it yourself | ✅ Yes — creates, edits, and deletes files directly |
| Can deploy to Azure | ❌ No | ✅ Yes — provisions resources, deploys apps, manages infrastructure |
| Can search GitHub | ❌ No | ✅ Yes — searches repos, issues, PRs, and code |
| Can search the web | ✅ Yes (with plugins) | ✅ Yes — built-in web search |
| Can connect to M365 | ❌ No direct connection | ✅ Yes — reads emails, searches SharePoint, checks Teams |
| Remembers context | Within one conversation | Within one session + permanent custom instructions |
| Works offline | ❌ No | ❌ No — both need internet |
The Mechanic Analogy
Understanding the Difference 🔧
Imagine your car is making a strange noise.
ChatGPT is like calling a mechanic on the phone. You describe the noise: "It's a clicking sound when I turn left." The mechanic says: "That's probably a worn CV joint. You'll need to remove the axle nut, pull the shaft, replace the joint, and reassemble." Helpful advice — but you still have to do the work. And if you've never worked on a car before, those instructions might as well be in a foreign language.
Copilot CLI is like having the mechanic in your garage, tools in hand. You say: "My car is clicking when I turn left." The mechanic walks over, pops the hood, inspects the CV joint, and says: "Found it. I'm going to replace this joint now — okay with you?" You say yes, and the mechanic does the work while you watch.
Both know what to do. But only one can actually do it.
When to Use ChatGPT vs Copilot CLI
Neither tool is "better" — they're designed for different situations:
| Situation | Best Tool | Why |
|---|---|---|
| Learning a concept (e.g., "explain DNS") | Either works | Both are great at explaining |
| Running a command on your machine | Copilot CLI | ChatGPT can't execute anything |
| Managing Azure resources | Copilot CLI | Direct connection to Azure via MCP servers |
| Writing an email or essay | ChatGPT | It's designed for creative text in a browser |
| Bulk file operations | Copilot CLI | Can read, edit, and manage files directly |
| Research on a topic | Either works | Both have web search |
| Debugging an error on your machine | Copilot CLI | It can read the error log, check configs, and fix the issue |
| Chatting on your phone | ChatGPT | Copilot CLI only runs in a terminal |
What Copilot CLI CANNOT Do
It's just as important to know the limits as the capabilities. Being honest about what it can't do helps you set realistic expectations:
| Limitation | Why | Workaround |
|---|---|---|
| ❌ Can't work offline | The AI runs on GitHub's cloud servers | Use PowerShell directly for offline tasks |
| ❌ Can't access other computers | It only runs commands on your machine | Set up remote connections (SSH, Azure CLI) first |
| ❌ Can't survive terminal closing | Close the terminal = end the session | Use /resume to come back later |
| ❌ Can't bypass Windows permissions | If your account can't do it, Copilot can't either | Run as admin if needed |
| ❌ Can't interact with GUI apps | It can't click buttons in Outlook, Teams, or any visual app | Use MCP servers for M365 data instead |
| ❌ Can't access camera or microphone | It's text-only | Not applicable for CLI |
| ❌ Can't remember across sessions (by default) | Each session starts fresh | Set up custom instructions (Module 10) |
A Good Mental Model
Copilot CLI is like a very smart, very fast colleague who sits inside your terminal. They can do anything you can do from the command line — but nothing more. They can't reach through the screen and click things, they can't work without internet, and they can't override your computer's security settings.
✅ Module 3 Checkpoint
At this point, you should understand:
- [x] ChatGPT can only TALK — Copilot CLI can TALK and DO
- [x] Copilot CLI executes commands, reads files, edits files, and connects to cloud services
- [x] ChatGPT is better for creative writing and phone-based chat
- [x] Copilot CLI is better for anything involving your computer, files, or cloud infrastructure
- [x] Copilot CLI has clear limitations — it can't work offline, access GUIs, or bypass Windows security
Module 4: Installing Copilot CLI
Time to get hands-on. In this module, you'll install Copilot CLI on your machine and sign in for the first time.
📑 In This Module
What is winget?
Before we install, let's understand the tool we'll use: winget (Windows Package Manager).
You know how your phone has an App Store where you search for apps, tap "Install", and they download automatically? winget is the same thing — but for your computer, from the command line.
| Phone App Store | winget | |
|---|---|---|
| Where | App Store / Google Play | Your terminal |
| How | Tap "Install" | Type winget install AppName |
| Updates | Automatic | winget upgrade AppName |
| Cost | Free | Free — comes built into Windows 10/11 |
You don't need to install winget — it's already on your computer if you have Windows 10 (version 1809+) or Windows 11.
Step-by-Step Installation
Installation differs by platform, but both are a single command.
Step 1: Open Windows Terminal (or PowerShell)
- Click the Start menu → type "Terminal" → click Windows Terminal
Step 2: Install Copilot CLI
winget downloads and installs Copilot CLI automatically. Takes about 30-60 seconds.
What if winget isn't found?
If you see "winget is not recognized", update Windows (Settings → Windows Update) or install App Installer from the Microsoft Store.
Step 1: Open Terminal
- Press
Cmd + Space(Spotlight) → type "Terminal" → press Enter
Step 2: Install Homebrew (if you don't have it)
Homebrew is macOS's package manager — like winget on Windows. Check if you have it:
If not installed, run:
Step 3: Install Copilot CLI
Takes about 30-60 seconds.
After installation (both platforms): Verify it worked by typing:
You should see a version number (e.g., 1.0.14). If you do, the installation was successful.
First-Time Authentication
The first time you launch Copilot CLI, it needs to verify who you are — just like signing into an app for the first time. This process is identical on Windows and macOS.
Launch Copilot CLI:
Step 5: Sign in with GitHub
Copilot will display a message like:
To sign in, open this URL in your browser: https://github.com/login/device
Enter the code: XXXX-XXXX
- Open the URL in your browser
- Enter the code shown in your terminal
- Click "Authorize"
- Return to your terminal — you should see a welcome message
You're in!
Once you see the Copilot CLI prompt (a cursor waiting for your input), you've successfully installed and authenticated. You're ready to have your first conversation.
You only sign in once
After the first authentication, Copilot remembers your identity. You won't need to sign in again unless you explicitly sign out or change computers.
Troubleshooting Common Issues
| Problem | Platform | Likely Cause | Solution |
|---|---|---|---|
winget not recognised |
Windows | Windows version too old | Update Windows or install App Installer from Microsoft Store |
brew not recognised |
macOS | Homebrew not installed | Install Homebrew first (see Step 2 above) |
copilot not recognised after install |
Both | Terminal needs to refresh its paths | Close and reopen your terminal |
| Authentication fails | Both | Firewall or corporate proxy blocking GitHub | Try on a personal network, or check with your IT team |
| "No Copilot subscription" error | Both | GitHub account doesn't have Copilot enabled | Sign up at github.com/features/copilot |
✅ Module 4 Checkpoint
- [x] winget is Windows' built-in package manager (like an app store from the command line)
- [x] Install with
winget install GitHub.Copilot - [x] Launch with
copilot - [x] First-time sign-in happens through your browser
- [x] You only need to sign in once
Module 5: Your First Conversation
This is the module where the magic happens. You're about to have your first real conversation with an AI that can actually do things on your computer.
📑 In This Module
Launching Copilot CLI
If you closed the terminal after Module 4, open it again and type:
You should see the Copilot CLI prompt — a cursor waiting for your input.
Your First Question
Type this exactly:
Press Enter and watch what happens.
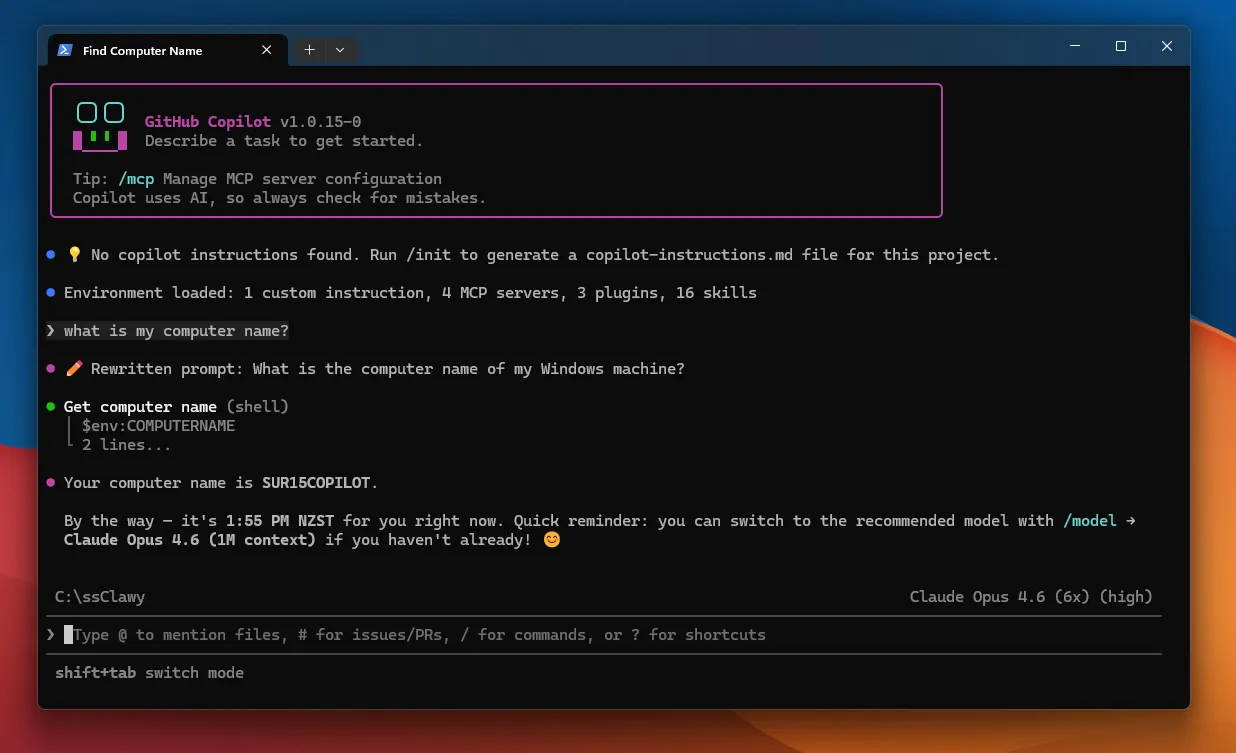
Copilot will:
- Read your question in plain English
- Figure out the right PowerShell command (probably
hostnameor$env:COMPUTERNAME) - Run that command on your machine
- Show you the result
You typed English. Copilot translated it to a command. The computer answered.
That's the core experience. No syntax to memorise. No manual pages to read. Just plain English.
What Happened Behind the Scenes?
Let's slow down and understand what just happened step by step:
You typed:        "What is my computer's name?"
                          │
                          ▼
Copilot understood: "The user wants the computer's hostname"
                          │
                          ▼
Copilot chose:     hostname  (a PowerShell command)
                          │
                          ▼
PowerShell ran:    hostname → returned "DESKTOP-ABC123"
                          │
                          ▼
Copilot responded: "Your computer's name is DESKTOP-ABC123"
Four layers working together:
- You spoke plain English
- Copilot (Floor 3) understood the intent and chose the right command
- PowerShell (Floor 2) executed the command
- Terminal (Floor 1) displayed the result
Try More Conversations
Now try these — each one shows a different capability:
Ask about your system:
Ask about your network:
Ask about your operating system:
Ask about running processes:
Ask it to explain something:
Notice the pattern
Every time, you typed a question in plain English. You didn't need to know that Get-PSDrive checks disk space, or that ipconfig shows your IP, or that Get-Process | Sort-Object WorkingSet -Descending | Select-Object -First 5 gets the top memory-hungry processes. Copilot knew all of that.
The "Aha Moment" 💡
Here's the moment most people "get it":
Without Copilot CLI, you'd need to:
- Know that the command for disk space is
Get-PSDrive -PSProvider FileSystem- Remember every parameter and flag
- Google the syntax when you forget
- Copy-paste from Stack Overflow
- Hope you got it right
With Copilot CLI, you just say:
"How much free disk space do I have?"
...and it figures out everything else.
This is the fundamental value proposition: you describe the WHAT, Copilot handles the HOW.
Your Turn — Freeform Exploration
Spend 2-3 minutes asking Copilot anything that comes to mind about your computer. Here are some ideas:
- "When was this computer last restarted?"
- "How many CPU cores does my machine have?"
- "What's the current CPU usage?"
- "List all installed programs"
- "Is my Windows Defender up to date?"
- "What users have accounts on this computer?"
There are no wrong questions. If Copilot doesn't understand, it'll ask you to clarify. If it can't do something, it'll tell you why.
✅ Module 5 Checkpoint
- [x] You've launched Copilot CLI and had your first conversation
- [x] You understand the flow: English → Copilot → PowerShell → Result
- [x] You've tried multiple questions across different categories
- [x] You've experienced the "aha moment" — describing WHAT you want, not HOW to do it
- [x] You're starting to feel comfortable typing questions in the terminal
Module 6: Navigating the File System
Before you can ask Copilot to work with files and folders, you need to understand how to move around your computer's file system from the terminal. Don't worry — there are only 5 commands to learn.
📑 In This Module
Your Computer's File System as a Building
Think of your file system as a building with rooms inside rooms:
C:\ (The Building - root of your C: drive)
├── Users\
│   └── Alex\  (Your apartment)
│       ├── Desktop\       (Your desk)
│       ├── Documents\     (Your filing cabinet)
│       ├── Downloads\     (Your mailbox)
│       ├── Pictures\      (Photo albums)
│       └── Music\         (Record collection)
├── Program Files\         (The building's utility rooms)
├── Windows\               (The building's engine room ⚠️ don't touch!)
└── Temp\                  (The building's storage closet)
When you open the terminal, you start in your "apartment" — usually C:\Users\YourName. From there, you can walk into any room (folder) or walk back out.
The Only 5 Commands You Need
| # | Command | What It Does | Analogy | Memory Trick |
|---|---|---|---|---|
| 1 | pwd |
Shows where you are right now | "What room am I in?" | Print Working Directory |
| 2 | ls |
Shows what's in the current folder | "What's in this room?" | List |
| 3 | cd foldername |
Move into a folder | "Walk into that room" | Change Directory |
| 4 | cd .. |
Go up one level (parent folder) | "Go back to the hallway" | .. means "one level up" |
| 5 | cd ~ |
Go to your home directory | "Go home" | ~ is shorthand for "home" |
That's genuinely it — just 5 commands
These 5 commands cover 90% of all navigation you'll ever do in the terminal. Everything else — creating folders, moving files, searching — you can ask Copilot to do for you in plain English.
Understanding Paths
Every file and folder on your computer has an address — called a path. It works just like a street address:
| Real World | Computer |
|---|---|
| 123 Queen Street, Auckland, New Zealand | C:\Users\Alex\Documents\report.docx |
| Country → City → Street → House | Drive → Folder → Subfolder → File |
There are two types of paths:
Absolute path — the full address from the very top:
Like saying: "123 Queen Street, Auckland, New Zealand" — unambiguous, works from anywhere.Relative path — relative to where you currently are:
Like saying: "Go to the Documents room and find report.docx" — only works if you're already inC:\Users\Alex.
When to use which?
- Absolute paths when you need to be precise (scripting, giving instructions to others)
- Relative paths for everyday navigation (it's faster to type)
Hands-On Exercise: Navigate Your File System
Follow along step by step. Type each command and observe the output.
Step 1: Check where you are
You'll see something like C:\Users\YourName — this is your home directory.
Step 2: See what's in this folder
You'll see folders like Desktop, Documents, Downloads, Pictures, etc. These are the "rooms" in your "apartment."
Step 3: Move into the Desktop folder
Step 4: Confirm you moved
Now it should show C:\Users\YourName\Desktop — you've walked into the Desktop room.
Step 5: See what's on your Desktop
You'll see files and folders that are on your Desktop. Anything you've saved to your Desktop is here.
Step 6: Go back up one level
Step 7: Confirm you're back
You should be back in C:\Users\YourName — you walked back out to the hallway.
Step 8: Try the Documents folder
See what's in your Documents folder from the terminal.
Step 9: Go all the way home in one step
Step 10: Confirm you're home
Back to C:\Users\YourName — no matter where you were, cd ~ always brings you home.
Congratulations! 🎉
You just navigated your file system entirely from the terminal. You walked into rooms, looked around, went back, and found your way home. These 5 commands will become second nature with just a little practice.
Common Navigation Mistakes (and How to Fix Them)
| Mistake | What You See | Fix |
|---|---|---|
| Typo in folder name | cd: no such file or directory |
Check spelling with ls first |
Trying to cd into a file |
Error — you can only cd into folders |
Use ls to identify folders vs files |
Going too many cd .. levels |
You end up at C:\ (the building lobby) |
Just type cd ~ to go home |
| Spaces in folder names | cd My Documents fails |
Use quotes: cd "My Documents" |
| Getting lost | You don't know where you are | Type pwd — it always tells you |
When to Navigate vs When to Ask Copilot
Here's a practical guide:
| Task | Do it Yourself | Ask Copilot |
|---|---|---|
| Move to a known folder | cd Documents ✅ |
Overkill |
| Find a file you can't locate | "Find all .pdf files in my Documents folder" ✅ | |
| Check what folder you're in | pwd ✅ |
Overkill |
| Create a new folder structure | "Create a folder called Projects with subfolders for 2024, 2025, 2026" ✅ | |
| Move between folders quickly | cd .. then cd other ✅ |
Overkill |
| Reorganise hundreds of files | "Move all .jpg files from Downloads to Pictures/2026" ✅ |
Rule of thumb
Use the 5 navigation commands for quick movement. Ask Copilot for anything that involves finding, creating, moving, or organising files — especially when dealing with many files at once.
✅ Module 6 Checkpoint
- [x] Your file system is like a building with rooms inside rooms
- [x] You know 5 navigation commands:
pwd,ls,cd,cd ..,cd ~ - [x] You understand absolute paths (full address) vs relative paths (from where you are)
- [x] You've navigated your own file system hands-on
- [x] You know when to navigate yourself vs when to ask Copilot
Module 7: Talking to Copilot — Plain English
You've already had your first few conversations in Module 5. Now let's go deeper — because how you ask matters just as much as what you ask.
📑 In This Module
The Art of Prompting
When you talk to Copilot CLI, you're writing a prompt — a question or instruction in plain English. The quality of your prompt directly affects the quality of the response.
Think of it like ordering food:
| Prompt Quality | Restaurant Order | Copilot Prompt |
|---|---|---|
| 😐 Vague | "Give me food" | "Do something with my files" |
| 🙂 Okay | "I'd like pasta" | "List my files" |
| 😊 Good | "I'd like spaghetti carbonara, al dente" | "List all .pdf files in my Documents folder, sorted by size" |
| 🤩 Great | "Spaghetti carbonara, al dente, extra parmesan, no mushrooms" | "List all .pdf files in my Documents folder larger than 10MB, sorted by size, and show the date they were last modified" |
The more specific you are, the better the result. But don't worry — starting vague is completely fine. Copilot will ask you to clarify if it needs more detail.
Vague vs Specific Prompts
Here are real examples showing how specificity improves results:
| ❌ Vague Prompt | ✅ Specific Prompt | Why the Specific One is Better |
|---|---|---|
| "Check my disk" | "Show me free space on all drives in GB" | Copilot knows exactly what metric and format you want |
| "Fix the network" | "Restart the DNS client service and flush the DNS cache" | Clear, actionable — Copilot can execute immediately |
| "Show me users" | "List all M365 users who haven't signed in for 30+ days" | Specifies the source, the filter, and the timeframe |
| "Help with Azure" | "List all Azure VMs in the East US region that are currently stopped" | Specifies service, region, and filter |
| "Make a script" | "Create a PowerShell script that checks disk space on all drives and sends an email alert if any drive is below 10% free" | Copilot knows the language, the logic, and the output |
You don't have to be perfect from the start
It's completely fine to start vague and refine. A real conversation might look like:
- You: "Show me large files"
- Copilot: "Which folder? How large is 'large'?"
- You: "In Downloads, anything over 100MB"
- Copilot finds them and shows results ✅
The conversation is iterative — you don't need to get it perfect on the first try.
Magic Phrases That Get Better Results
There are certain phrases that consistently produce better responses. Think of them as power words:
| Magic Phrase | What It Does | Example |
|---|---|---|
| "Explain like I'm new to..." | Gets a beginner-friendly explanation | "Explain DNS like I'm new to networking" |
| "Step by step" | Gets a numbered, sequential walkthrough | "Step by step, how do I set up a VPN connection?" |
| "What does this do?" | Gets a plain English explanation of a command | "What does netstat -an do?" |
| "Show me an example" | Gets a concrete, working example | "Show me an example of a PowerShell loop" |
| "What's the difference between..." | Gets a clear comparison | "What's the difference between a VNet and a subnet?" |
| "Before you do anything, explain what you're going to do" | Copilot explains first, acts second | Any risky or complex task |
| "Can you also explain why?" | Adds reasoning to the answer | After any command or instruction |
| "Put this in my docs" | Saves important info to your learning documentation | After learning something you want to remember |
Hands-On: Practice Prompting
Try these prompts and observe how Copilot responds differently:
Start vague, then get specific:
Then follow up:
Ask it to teach:
Ask for a comparison:
Ask it to plan before acting:
I want to clean up my Downloads folder. Before you do anything,
tell me what you'd recommend and why.
✅ Module 7 Checkpoint
- [x] Prompt quality matters — specific prompts get better results
- [x] Starting vague is fine — you can refine through conversation
- [x] Magic phrases like "step by step" and "explain like I'm new" improve responses
- [x] Copilot conversations are iterative — think of it as a dialogue, not a single command
Module 8: Slash Commands & the ! Prefix
In Module 4, we briefly mentioned slash commands. Now let's cover them properly — along with a power-user trick called the ! prefix.
📑 In This Module
What Are Slash Commands?
Slash commands start with / and perform specific actions instantly. They're not questions or conversations — they're buttons. You press them and something specific happens.
Analogy: If plain English is like having a conversation with a colleague, slash commands are like pressing buttons on a remote control. Each button does one specific thing, every time.
The Complete Slash Command Reference
Here's every slash command you need to know, organised by what they do:
📋 Session Management
| Command | What It Does | When to Use It |
|---|---|---|
/new |
Start a brand new session | When you're switching to a completely different task |
/resume |
Go back to a previous session | When you want to continue work from yesterday |
/rename |
Give your current session a name | Before exiting an important session — makes it easier to find later |
/exit |
End the session and close Copilot | When you're done for the day |
🧠 Memory Management
| Command | What It Does | When to Use It |
|---|---|---|
/compact |
Summarise the conversation to free up memory | When the context is getting full (yellow/red zone) |
/clear |
Wipe the conversation completely | When you want a fresh start without closing Copilot |
/context |
Show how full your "whiteboard" is | To check if you're running low on context space |
⚙️ Configuration
| Command | What It Does | When to Use It |
|---|---|---|
/model |
Switch which AI model you're using | When you want a different brain (cheaper, smarter, etc.) |
/usage |
Check your remaining premium requests | To monitor your monthly budget |
/skills |
List available skills | To see what capabilities are currently active |
/plugin |
Manage plugins | To enable/disable add-on features |
/mcp |
Manage MCP server connections | To connect/disconnect cloud services |
🔧 Advanced
| Command | What It Does | When to Use It |
|---|---|---|
/help |
Show all available commands | When you forget what's available |
/add-dir |
Give Copilot access to an additional folder | When you need to work with files outside your current directory |
/diff |
Show what changes Copilot has made to files | To review edits before committing them |
/rewind |
Undo Copilot's last action | When something went wrong |
You don't need to memorise all of these
Start with just these 4: /help, /model, /resume, /compact. They cover 90% of what you'll need day-to-day. You can always type /help to see the full list.
The ! Prefix — Bypassing Copilot
There's a special trick: if you put ! before any command, it bypasses Copilot entirely and runs the command directly in PowerShell (or your shell).
This skips the AI completely. No interpretation, no translation — just raw command execution.
Why would you want to bypass Copilot?
| Situation | Use ! Prefix |
Use Copilot (no prefix) |
|---|---|---|
| You know the exact command already | !Get-Date ✅ |
Overkill — Copilot would just run the same thing |
| Quick one-liner you've used before | !pwd ✅ |
Unnecessary overhead |
| Running a build or test command | !npm run build ✅ |
Just run it directly |
| You want help figuring out the command | "How do I check the date?" ✅ | |
| You want Copilot to explain something | "What does Get-Date -Format do?" ✅ | |
| Complex task requiring multiple steps | "Clean up temp files older than 30 days" ✅ |
Think of it like this
Without ! = Asking your colleague: "Hey, can you check what time it is?" (They interpret your request, check the clock, and tell you.)
With ! = Looking at the clock yourself. (Faster when you already know where the clock is.)
Hands-On: Try All Three Communication Styles
Let's try the same goal three different ways:
Goal: Find out today's date and time
Style 1 — Plain English:
Style 2 — Slash command:
(This doesn't answer the question, but it shows you all available commands.)Style 3 — ! prefix:
All three are valid. Over time, you'll develop an instinct for which to use:
- Plain English for most tasks (90% of the time)
- Slash commands for session management and configuration
!prefix for quick commands you already know
✅ Module 8 Checkpoint
- [x] Slash commands start with
/and perform specific actions - [x] Key commands:
/help,/model,/resume,/compact,/usage - [x] The
!prefix bypasses Copilot and runs commands directly in the shell - [x] Use
!when you know the command, use plain English when you want help - [x] You've tried all three communication styles
Module 9: What is a Session?
You've been using Copilot CLI for a few modules now. Every time you launched copilot and started chatting, you were inside a session. But what exactly is a session, and why does it matter?
📑 In This Module
The Phone Call Analogy
A session is a single conversation between you and Copilot. Think of it exactly like a phone call:
| Phone Call | Copilot Session |
|---|---|
| You dial someone's number | You type copilot to launch |
| You talk back and forth | You chat back and forth |
| The person remembers everything said during the call | Copilot remembers everything in the session |
| You mention something from 10 minutes ago — they remember | You reference something from earlier — Copilot remembers |
| You hang up | You type /exit or close the terminal |
| After hanging up, the call is over | After exiting, the session is saved |
| You can call back and say "remember our conversation?" | You can type /resume and pick up where you left off |
Key concept: Within a session, Copilot remembers everything — your questions, its answers, files it read, commands it ran, decisions you made together. But when you start a new session, it starts completely fresh with no memory of previous sessions.
Why does this matter?
If you're working on a project across multiple days, you have two choices:
- Resume the same session (
/resume) — Copilot remembers everything from before - Start a new session — Copilot has no idea what you worked on yesterday
Knowing this helps you decide when to continue vs start fresh.
What Gets Remembered in a Session?
| ✅ Remembered | ❌ Not Remembered |
|---|---|
| Every message you typed | Anything from a different session |
| Every response Copilot gave | Files you didn't explicitly share |
Files Copilot read with @ |
Commands you ran outside Copilot |
| Commands Copilot ran for you | Other people's sessions |
| Decisions and plans you discussed | System changes made by other tools |
Managing Your Sessions
Here are the key session commands you'll use:
Starting and Ending
copilot           → Start a new session
/exit             → End the session cleanly (saves automatically)
/new              → End current session and start a fresh one (without closing Copilot)
Naming Sessions
Before you exit an important session, give it a name:
This makes it much easier to find later. Without a name, sessions are listed by date and a snippet of the first message — not very helpful when you have dozens.
Resuming Past Sessions
You'll see a list of your recent sessions. Named sessions stand out immediately:
1. Azure VM cleanup (2 hours ago)
2. "What is my computer's name?" (yesterday)
3. "Help me write a script" (3 days ago)
Select one and you're right back where you left off — Copilot remembers the entire conversation.
The Session Exit Summary
When you type /exit, Copilot shows a summary — like a receipt for your session:
Session Summary:
├── Duration: 45 minutes
├── Messages: 23 exchanges
├── Files read: 3
├── Files modified: 1
├── Commands executed: 12
└── Session saved ✅
This tells you at a glance what was accomplished during the session.
When to Start Fresh vs Resume
| Scenario | Best Action | Why |
|---|---|---|
| Continuing yesterday's project | /resume |
Keep all the context |
| Completely different task | /new |
Clean whiteboard for the new topic |
| Session is getting slow/confused | /new |
Fresh start often fixes issues |
| Quick one-off question | New session | Don't pollute a long-running project session |
| Learning a new topic | New session | Keep learning sessions separate from work |
Golden Rule: One Topic Per Session
Sessions work best when they're focused on one topic. If you're working on an Azure project and suddenly need help with a PowerShell script for something unrelated, start a new session. Mixing topics confuses the AI and fills up your context window faster.
✅ Module 9 Checkpoint
- [x] A session = one conversation, like a phone call
- [x] Everything is remembered within a session
- [x]
/resumebrings back past sessions with full context - [x]
/renameyour sessions before exiting important ones - [x]
/exitsaves automatically and shows a summary - [x] One topic per session = best results
Module 10: The Passport Strategy — Custom Instructions
This is arguably the most powerful concept in Copilot CLI. If you only take one thing from this study guide, make it this module.
📑 In This Module
The Problem: Repeating Yourself Every Session
Remember the phone call analogy? Each session is a separate call. When you start a new session, Copilot doesn't know:
- Who you are
- What you work on
- What tools you use
- Your preferences
- Your environment
So every new session, you'd find yourself saying things like:
"I'm an IT admin. I use PowerShell, not Bash. I work with Azure and M365. I prefer concise answers. My timezone is Eastern..."
That gets old fast.
The Solution: Your Passport
Imagine travelling internationally. Every time you land in a new country (new session), you'd have to explain who you are, where you're from, and why you're visiting. Exhausting.
But you have a passport 🛂 — a document that carries your identity with you everywhere. You show it once, and the customs officer knows everything they need.
Custom instructions are your passport for Copilot CLI.
Here's how it works:
- You create a file called
copilot-instructions.mdin a special location - Copilot reads this file automatically at the start of every session
- It contains your identity, preferences, and environment details
- You never repeat yourself again
┌──────────────────────────────────────────────────┐
│              WITHOUT INSTRUCTIONS                 │
│                                                   │
│  Session 1: "I'm Alex, I use PowerShell..."      │
│  Session 2: "I'm Alex, I use PowerShell..."      │
│  Session 3: "I'm Alex, I use PowerShell..."      │
│  Session 4: "I'm Alex, I use PowerShell..."      │
│  😩 Repeating yourself every single time          │
└──────────────────────────────────────────────────┘

┌──────────────────────────────────────────────────┐
│              WITH INSTRUCTIONS (PASSPORT)         │
│                                                   │
│  📄 copilot-instructions.md:                     │
│    "Alex, IT admin, PowerShell, Azure, M365"     │
│                                                   │
│  Session 1: Copilot already knows ✅              │
│  Session 2: Copilot already knows ✅              │
│  Session 3: Copilot already knows ✅              │
│  Session 4: Copilot already knows ✅              │
│  😊 Never repeat yourself again                   │
└──────────────────────────────────────────────────┘
What to Put in Your Instructions
Your instructions file should contain anything you'd tell a new colleague on their first day working with you:
| Category | Examples |
|---|---|
| Who you are | Name, role, team, timezone |
| Your environment | OS (Windows/Mac), terminal app, cloud services you use |
| Preferences | Preferred shell (PowerShell vs Bash), response length, explanation style |
| Tools you use | Azure, M365, specific software |
| Working style | "Explain commands before running them", "Keep responses concise" |
| Common tasks | "I frequently manage Azure VMs", "I often reset M365 passwords" |
Example Instructions File
Here's what a complete instructions file looks like:
# About Me
- Name: Alex
- Role: IT Administrator at Northwind Traders
- Timezone: US Eastern (UTC-5)
- Experience: 10+ years in IT, comfortable with GUIs, learning CLI

# My Environment
- OS: Windows 11
- Terminal: Windows Terminal
- Shell: PowerShell (preferred — don't use Bash)
- Cloud: Azure + Microsoft 365

# Preferences
- Explain what a command does before running it
- Keep responses concise but clear
- When I ask about Azure, use Azure CLI (az) commands
- Use tables for comparisons
- Flag any risks with warnings

# Common Tasks
- Managing M365 users and licenses
- Azure VM management (start, stop, resize)
- PowerShell scripting for automation
- Checking system health and disk space
Where Does the File Go?
The instructions file can live in several locations, depending on scope:
| Location | Scope | When to Use |
|---|---|---|
~/.copilot/copilot-instructions.md |
Global — applies to ALL sessions everywhere | Your main identity and preferences |
.github/copilot-instructions.md (in a project folder) |
Project — applies when working in that folder | Project-specific context (tech stack, conventions) |
For most users, the global file is all you need. Create it once and forget about it — Copilot loads it automatically.
How to create your instructions file
The easiest way? Just ask Copilot:
Create a custom instructions file for me. I'm an IT admin named Alex,
I use PowerShell on Windows 11, I work with Azure and M365, and I
prefer concise explanations with commands explained before running.
Copilot will create the file in the right location for you.
The Three-Layer Memory Model
Your Copilot CLI experience uses three layers of memory, each with a different lifespan:
┌──────────────────────────────────────────────────┐
│ Layer 3: DOCUMENTATION (forever)                  │
│ Learning portal, study guides, notes              │
│ Survives everything — it's just files on disk     │
├──────────────────────────────────────────────────┤
│ Layer 2: INSTRUCTIONS / PASSPORT (permanent)      │
│ copilot-instructions.md                           │
│ Loaded at the start of every session              │
├──────────────────────────────────────────────────┤
│ Layer 1: SESSION (temporary)                      │
│ Current conversation                              │
│ Lost when you /exit or /clear                     │
└──────────────────────────────────────────────────┘
| Layer | Lifespan | What It Holds | Analogy |
|---|---|---|---|
| Session | Until you exit | Current conversation, files read, commands run | A phone call — temporary |
| Instructions | Forever (until you edit) | Your identity, preferences, environment | Your passport — permanent identity |
| Documentation | Forever | Notes, guides, references you've saved | Your filing cabinet — permanent knowledge |
The Most Important Workflow
Here's the workflow that makes Copilot CLI truly powerful:
1. Learn something useful during a session
          │
          ▼
2. Save important parts to your INSTRUCTIONS (passport)
   or to your DOCUMENTATION (notes/docs)
          │
          ▼
3. /compact or /clear the session (free up space)
          │
          ▼
4. Next session — Copilot already knows
   everything you saved ✅
Learn it → Save it → Clear the session → Move on.
This cycle means your Copilot gets smarter over time — not because the AI model changes, but because your instructions file grows with every important discovery.
This is the secret to getting more value over time
Most people use Copilot CLI as a blank slate every session. Power users build up their instructions file so every session starts with rich context. It's the difference between a new temp worker and a colleague who's been with you for years.
✅ Module 10 Checkpoint
- [x] Custom instructions = your permanent "passport" loaded at every session start
- [x] Put your identity, preferences, environment, and common tasks in the file
- [x] Global file lives at
~/.copilot/copilot-instructions.md - [x] Three memory layers: Session (temporary) → Instructions (permanent) → Documentation (forever)
- [x] The power workflow: Learn → Save → Clear → Move on
- [x] Your Copilot gets smarter over time through a better instructions file
Module 11: The Context Window — Your Whiteboard
Every conversation you have with Copilot happens on a shared whiteboard — a limited space where everything must fit. Understanding this whiteboard is the difference between smooth sessions and frustrating ones.
📑 In This Module
What is the Context Window?
When you chat with Copilot, everything — your messages, Copilot's responses, files it read, tool definitions, system instructions — gets placed on an invisible whiteboard. The AI can only "see" what's on this whiteboard.
The whiteboard has a fixed size, measured in tokens.
What's a token?
A token is roughly ¾ of a word (about 4 characters). It's the unit the AI uses to measure text.
| Example | Approximate Tokens |
|---|---|
Hello |
1 token |
Good morning |
2 tokens |
PowerShell |
2-3 tokens |
| A full page of text (~400 words) | ~500-800 tokens |
| An entire novel (~80,000 words) | ~100,000 tokens |
The standard context window is 200,000 tokens — roughly 150,000 words, or about 2-3 full novels. That sounds huge, but it fills up faster than you'd think.
What's ON the Whiteboard?
Here's the surprising part — the whiteboard isn't empty when you start. A significant portion is already taken up before you say hello:
╔══════════════════════════════════════════════════╗
║              THE WHITEBOARD (200k tokens)         ║
╠══════════════════════════════════════════════════╣
║                                                   ║
║  ██████████████████░░░░░░░░░░░░░░░░░░░░░░░░░░░░ ║
║  ▲ System/Tools: ~35%         Free: ~60%      ▲  ║
║  │                                            │  ║
║  Loaded BEFORE you                        Buffer ║
║  say hello!                                (5%)  ║
║                                                   ║
╚══════════════════════════════════════════════════╝
| Section | Typical Size | What It Contains | Analogy |
|---|---|---|---|
| System / Tools | ~30-40% | Copilot's instructions, all available tools (Azure, GitHub, MCP), your custom instructions | The café's operating manual — always pinned to the whiteboard |
| Messages | Grows over time | Your entire conversation history | The order history — every coffee you've ordered today |
| Free space | Shrinks over time | Room for more conversation | Empty whiteboard space |
| Buffer | ~5% | Safety margin so Copilot doesn't crash mid-response | Reserved space — like keeping the last page blank |
Surprising Fact
30-40% of your whiteboard is used before you even say hello! That's because all the tool definitions, MCP server connections, and system instructions are loaded automatically. Your effective usable space is about 120-140k tokens, not 200k.
The Traffic Light System
As your conversation grows, the whiteboard fills up. Use this traffic light to know when to take action:
🟢 GREEN  (0-60% used)    Everything is fine. Keep going.
🟡 YELLOW (60-80% used)   Consider /compact or /new soon.
🔴 RED    (80%+ used)     Act NOW — /compact, save work, or /clear.
What happens at each stage:
| Stage | What You'll Notice | What to Do |
|---|---|---|
| 🟢 Green | Everything works perfectly | Nothing — keep working |
| 🟡 Yellow | Copilot might show a subtle warning | Run /compact to summarise and shrink the conversation |
| 🔴 Red | Responses may get slower or less accurate | Run /compact immediately, or /new to start fresh |
| 💥 Full | Auto-compact kicks in (may lose important details) | Too late — should have acted at yellow |
Don't wait for the red zone
At 95%+, Copilot will try to auto-compact (automatically summarise the conversation). But auto-compact can lose important details because it decides what to keep without asking you. It's always better to manage it yourself at the yellow stage.
Three Commands for Whiteboard Management
| Command | What It Does | Whiteboard Effect | When to Use |
|---|---|---|---|
/compact |
Summarises the conversation into a shorter version | Frees up space while keeping key context | Yellow zone — you want to keep working but need more room |
/clear |
Wipes the conversation completely | Resets to empty (system/tools remain) | When you want a totally fresh start |
/new |
Ends the session and starts a new one | Brand new whiteboard | When switching to a different topic entirely |
Analogy: The Desk 🖥️
Think of your whiteboard as a desk.
/compact= Tidying your desk — filing papers into folders, throwing out notes you don't need. The desk is still yours, with your important stuff, but there's more room now./clear= Clearing everything off the desk. Clean slate, but you'll need to bring things back if you need them./new= Moving to a completely different desk in a different room.
5 Strategies to Keep Your Whiteboard Healthy
| # | Strategy | How | Why It Helps |
|---|---|---|---|
| 1 | Be selective with files | Don't share huge files unless you need them — use @ only for specific files |
Every file eats whiteboard space |
| 2 | One topic per session | Use /new when switching tasks |
A focused session stays smaller |
| 3 | /compact proactively |
Run it when you hit the yellow zone, not the red | Saves space before it becomes critical |
| 4 | Save important things to instructions | Use the Passport Strategy from Module 10 | Important context survives /clear and /new |
| 5 | Start new sessions for new topics | Don't mix Azure work with PowerShell scripting in one session | Each topic gets a clean, focused whiteboard |
How to Check Your Whiteboard
Type /context at any time to see how full your whiteboard is:
You'll see a breakdown showing: - Total context window size - How much is used by system/tools - How much is used by your conversation - How much free space remains
✅ Module 11 Checkpoint
- [x] The context window is a shared whiteboard with a fixed size (~200k tokens)
- [x] 30-40% is used by system/tools before you even start
- [x] Traffic light system: Green (fine) → Yellow (compact soon) → Red (act now)
- [x]
/compactshrinks,/clearresets,/newstarts fresh - [x] Check usage with
/context - [x] Proactive management prevents auto-compact from losing your important context
Module 12: Choosing the Right AI Model
Every time you chat with Copilot CLI, your messages are processed by an AI model — a specific "brain." Different models have different strengths, speeds, and costs. Choosing the right one is like choosing the right tool for the job.
📑 In This Module
The Chef Analogy
Think of AI models as different chefs at a restaurant. They all cook food, but each has a different specialty, speed, and price tag:
| Model | Chef Personality | Speed | Quality | Cost |
|---|---|---|---|---|
| Claude Haiku 4.5 | 🍔 Fast-food cook | ⚡ Very fast | Good | 0.33× (cheapest) |
| Claude Sonnet 4 | 🧑🍳 Reliable head chef | Fast | Very good | 1× (standard) |
| Claude Opus 4.6 | 👨🍳 Michelin-star chef | Moderate | Excellent | 1× (standard) |
| GPT-4.1 / GPT-4o | 🏠 House cook | Fast | Good | Free (unlimited) |
| GPT-5.1 | 🍝 Chef from another restaurant | Fast | Very good | 1× (standard) |
| Claude Opus 4.6 (1M) | 👨🍳 Same Michelin chef, massive kitchen | Moderate | Excellent | 6× (expensive) |
What do the costs mean?
The cost column shows how many premium requests each message uses from your monthly budget. We'll cover this in detail in Module 13. For now, just know that:
- 0.33× = Very cheap — stretches your budget 3×
- 1× = Standard price
- 6× = Expensive — use sparingly
- Free = Unlimited, but less capable
How to Switch Models
Type /model at any time:
You'll see a menu of available models. Select one and all future messages in that session will use that model.
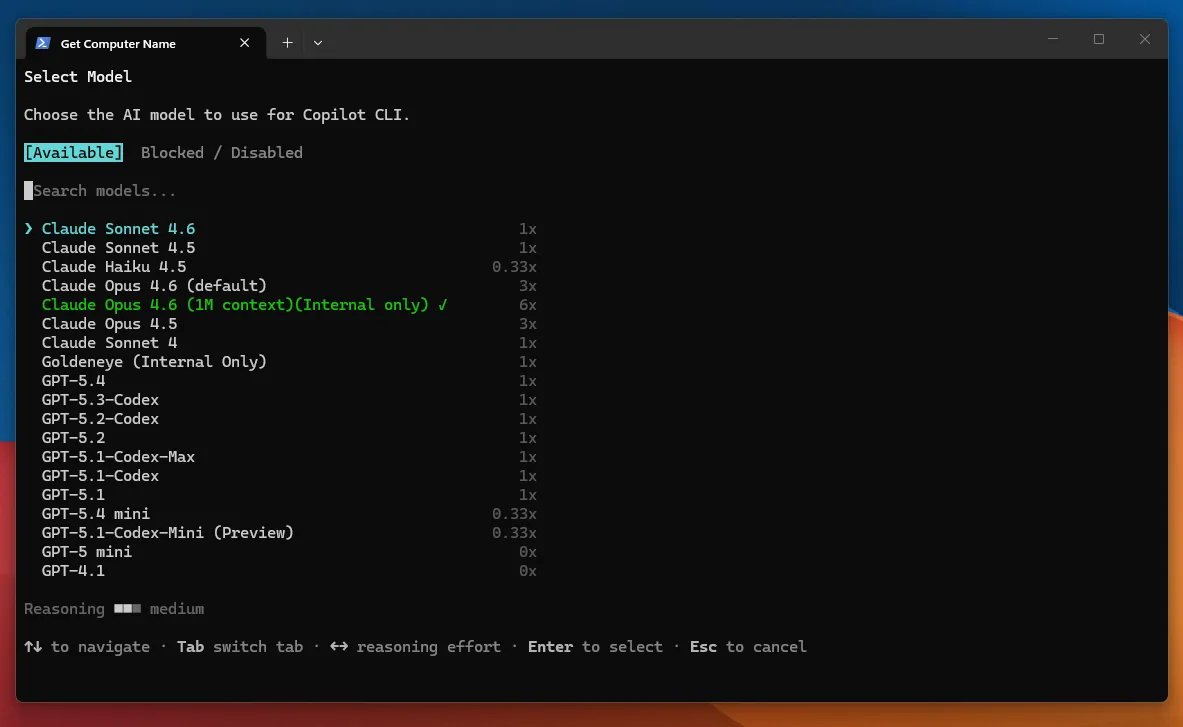
What carries over when you switch:
- ✅ Your entire conversation history (stays on the whiteboard)
- ✅ Files that were read into context
- ✅ Decisions and plans already discussed
- 🔄 The "brain" processing everything changes
Analogy: Switching chefs mid-meal 🍳
It's like switching chefs halfway through cooking dinner. The new chef reads all the previous chef's notes (your conversation), but they might interpret the recipe slightly differently. The kitchen (whiteboard) stays the same — only the person cooking changes.
Which Model Should You Choose?
Here's a simple decision guide:
What are you doing?
│
├── 💬 Quick question or simple lookup
│   └── → Claude Haiku 4.5 (0.33×)
│       Save budget — it's fast and good enough
│
├── 📚 Learning, daily work, or writing
│   └── → Claude Opus 4.6 (1×)
│       Best quality brain at standard cost
│
├── 🔄 Want a different perspective
│   └── → GPT-5.1 (1×)
│       Different "restaurant" — different approach
│
├── 💰 Budget is tight or running low
│   └── → GPT-4.1 (Free)
│       Unlimited, less capable, but always available
│
└── 🏗️ Massive project with huge files
    └── → Claude Opus 4.6 1M (6×)
        Only when you truly need the extra space
Best Practices for Model Switching
| ✅ Do | ❌ Don't |
|---|---|
| Start with Opus 4.6 for best quality | Don't switch models mid-complex-task — it can cause confusion |
| Switch to Haiku for simple follow-up questions | Don't assume the new model "knows" implicit context |
Run /compact before switching (clean whiteboard) |
Don't switch back and forth repeatedly |
| Brief the new model after switching: "I'm working on X, we decided Y" | Don't use the 1M model for short conversations |
Default recommendation
Start with Claude Opus 4.6 or Sonnet 4 for everyday work. Switch to Haiku when doing simple things to save budget. Only use the 1M model when you genuinely need the massive context space (very long sessions with many large files).
✅ Module 12 Checkpoint
- [x] Different models = different strengths, speeds, and costs
- [x] Switch models anytime with
/model - [x] Opus 4.6 = best quality at standard cost (recommended default)
- [x] Haiku = cheapest option — great for simple tasks
- [x] GPT-4.1 = free and unlimited, but less capable
- [x] Your conversation carries over when switching — only the brain changes
Module 13: Premium Requests & Budget Management
Now let's talk about the money side — how much Copilot CLI costs and how to manage your monthly budget wisely.
📑 In This Module
What Are Premium Requests?
Every time you send a message to a premium AI model (like Claude Opus or Sonnet), it costs premium requests from your monthly budget. Think of it like a mobile phone data plan:
| Mobile Data Plan | Copilot Plan |
|---|---|
| You get 10GB of data per month | You get a set number of premium requests per month |
| Streaming video uses more data than texting | Expensive models use more requests than cheap ones |
| When you run out, speed drops (but phone still works) | When you run out, model drops to free tier (but Copilot still works) |
| Resets on the 1st of the month | Resets on the 1st of the month (midnight UTC) |
The Plans
| Plan | Monthly Price | Premium Requests | Best For |
|---|---|---|---|
| Free | $0 | 50 | Trying Copilot out, casual use |
| Pro | $10/month | 300 | Light personal use |
| Pro+ | $39/month | 1,500 | Heavy personal use (power users) |
| Business | $19/user/month | 300 per user | Teams and organisations |
| Enterprise | $39/user/month | 1,000 per user | Large organisations |
Which plan to start with?
- 50 requests (Free) → You'll burn through this in one or two learning sessions
- 300 requests (Pro) → Fine for light daily use
- 1,500 requests (Pro+) → Solid for daily power use — but model choice matters (see below)
Model Multipliers — The Hidden Cost
Here's the critical detail most people miss: not all messages cost the same. Different models have different multipliers:
| Model | Multiplier | Requests Used Per Message | With Pro+ (1,500), You Get |
|---|---|---|---|
| GPT-4.1 / GPT-4o | 0× | 0 (unlimited) | ∞ unlimited messages |
| Claude Haiku / GPT-5.4 mini | 0.33× | 0.33 | ~4,545 messages |
| Claude Sonnet / Opus / GPT-5.1 | 1× | 1 | 1,500 messages |
| Claude Opus 4.6 (1M context) | 6× | 6 | ~250 messages |
| GPT-4.5 | ~50× | 50 | ~30 messages 😱 |
Watch out for expensive models!
A single message using GPT-4.5 costs 50 premium requests. That means just 30 messages would eat your entire Pro+ budget for the month. Always check the multiplier before using expensive models.
What Happens When You Run Out?
This is the most common worry: "Does Copilot stop working?"
No! Copilot does not stop working. It drops to the free model:
graph TD
    A([🎯 You send a message]) --> B{Premium requests<br/>remaining?}
    B -->|✅ Yes| C([Uses your selected premium model<br/>Claude Opus, Sonnet, etc.])
    B -->|❌ No| D{Pay-per-use<br/>enabled?}
    D -->|Yes| E([Continues with premium model<br/>Charges ~$0.04/request × multiplier])
    D -->|No| F([Falls back to GPT-4.1<br/>Unlimited but less capable])

    style A fill:#1a1a2e,stroke:#ff66ff,color:#fff,font-weight:bold
    style B fill:#1a1a2e,stroke:#66ffff,color:#fff,font-weight:bold
    style C fill:#1a5e2a,stroke:#66ff66,color:#fff,font-weight:bold
    style D fill:#1a1a2e,stroke:#66ffff,color:#fff,font-weight:bold
    style E fill:#5e4a1a,stroke:#ffcc66,color:#fff,font-weight:bold
style F fill:#5e1a1a,stroke:#ff6666,color:#fff,font-weight:bold| Scenario | What Happens |
|---|---|
| Within limit | ✅ Everything works normally with your chosen model |
| Hit the limit (no budget set) | ⚠️ Falls back to GPT-4.1 — unlimited but less capable |
| Hit the limit (budget enabled) | 💰 Continues with premium models, charges ~$0.04/request × multiplier |
| Quota reset | 🔄 1st of every month at midnight UTC — counter resets to zero |
Copilot CLI never stops working
When you exhaust your premium requests, Copilot drops you to the free base model (GPT-4.1). You lose access to Claude, GPT-4.5, and other premium models until next month — unless you enable overage billing. But the tool itself keeps working.
Real-World Budget Example
Let's say you're on Pro+ (1,500 requests/month) and use Copilot CLI daily:
| Usage Pattern | Daily Messages | Monthly Requests Used | Verdict |
|---|---|---|---|
| All Haiku (0.33×) | 75/day | ~750 | ✅ Plenty left |
| All Opus (1×) | 75/day | ~2,250 | ⚠️ Over budget by week 3 |
| Mix: 50 Haiku + 25 Opus | 75/day | ~1,025 | ✅ Fits within budget |
| 10 GPT-4.5 messages | 10/day | 500 per day! | 😱 Budget gone in 3 days |
How to Monitor Your Usage
| Method | How to Access | What You See |
|---|---|---|
| In Copilot CLI | Type /usage |
Remaining requests and reset date |
| GitHub Billing Dashboard | github.com/settings/billing | Full analytics: by model, product, trends |
| In VS Code (if you use it) | Click Copilot icon in status bar | Used / remaining / reset date |
6 Budget Tips
| # | Strategy | Impact | How |
|---|---|---|---|
| 1 | Use Haiku for simple tasks | Save ~67% per message | /model → Haiku for quick questions |
| 2 | Batch your questions | Fewer turns = fewer requests | Ask 3 things in one message instead of 3 separate messages |
| 3 | Use /compact regularly |
Indirect savings | Shorter context = less processing |
| 4 | Monitor weekly | Catch overspending early | Check /usage every Monday |
| 5 | Avoid GPT-4.5 | Save 50× per message | Use Opus (1×) instead — similar quality |
| 6 | Enable pay-per-use as a safety net | Never lose access unexpectedly | Set a small budget ($5-10) at github.com/settings/billing |
The Sweet Spot
Mix Haiku (for simple tasks) + Opus/Sonnet (for complex work). This combination can comfortably get you through 50-75 messages per day for a full month on Pro+.
✅ Module 13 Checkpoint
- [x] Premium requests are your monthly AI budget — different plans give different amounts
- [x] Model multipliers: Haiku (0.33×) → Opus/Sonnet (1×) → Opus 1M (6×) → GPT-4.5 (50×!)
- [x] When you run out, Copilot falls back to GPT-4.1 (free) — it doesn't stop working
- [x] Monitor with
/usageor the GitHub billing dashboard - [x] Mix Haiku + Opus for the best budget efficiency
- [x] Quota resets on the 1st of every month at midnight UTC
Module 14: Safety & Permissions
Copilot CLI can do a lot — read files, run commands, edit your system. So how do you make sure it doesn't do something you don't want? The answer: four layers of safety, and you are always the final checkpoint.
📑 In This Module
4 Layers of Protection
Think of it like security at an airport — your request passes through multiple checkpoints before anything happens:
| Layer | What It Does | Analogy |
|---|---|---|
| 🚪 Layer 1: Content Filters | Blocks harmful or malicious requests before they reach the AI | Bouncer at the door — if your request looks suspicious, it doesn't get in |
| 👨🍳 Layer 2: Model Training | The AI itself was trained to refuse dangerous actions | Chef who won't serve raw chicken — even if ordered, the chef knows better |
| 👔 Layer 3: Tool Permissions | Copilot asks permission before running anything risky | Manager who checks with you first — "Should I go ahead with this?" |
| ✅ Layer 4: Your Approval | Nothing happens without your explicit "yes" | You are the final checkpoint — nothing gets past you |
The Approval Prompt
When Copilot wants to run a command that could change something on your system, you'll see an approval prompt:
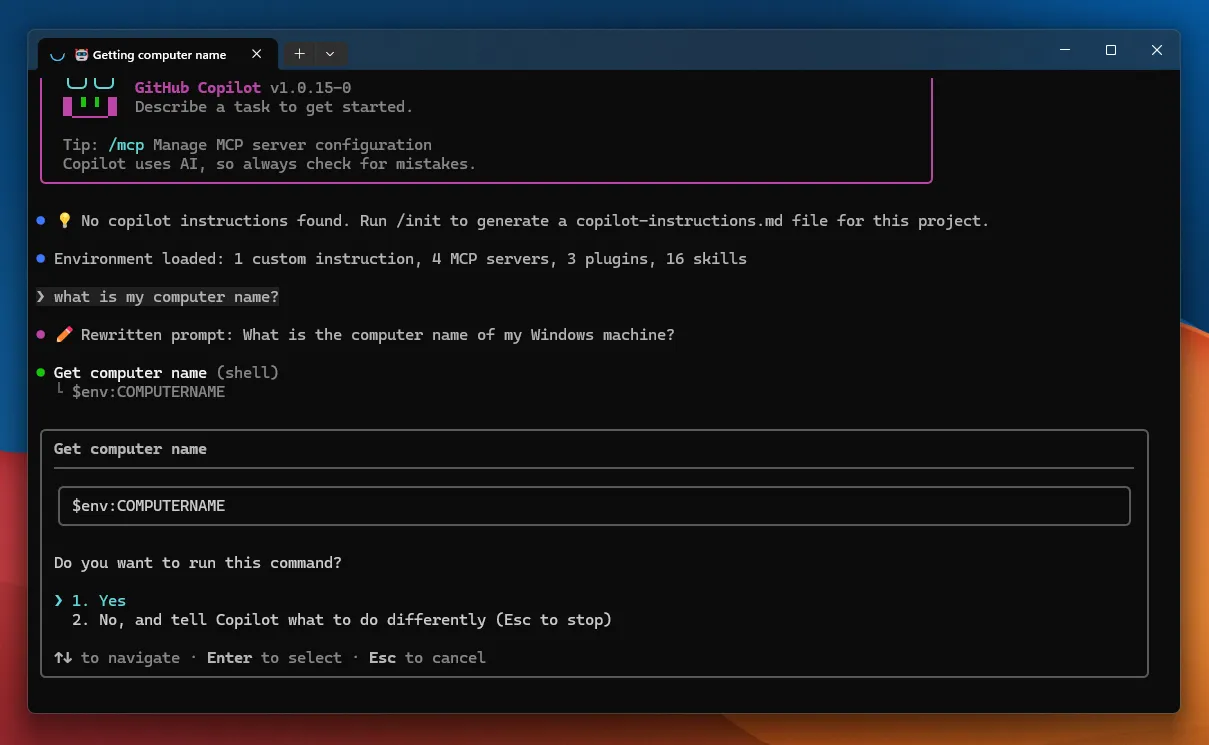
Your options:
| Key | What It Does | When to Use |
|---|---|---|
y |
Allow this one action | You've read it and it looks correct |
a |
Allow all actions of this type for the rest of the session | You trust Copilot for this batch of work (use with caution) |
n |
Deny — nothing happens, nothing breaks | You're not sure, or the command looks wrong |
The Golden Rule
Always read what Copilot is about to do before pressing Y. If a command looks unfamiliar or risky, press n and ask:
Copilot will explain in plain English. Then you can make an informed decision.
What Needs Approval vs What Doesn't
Not everything triggers an approval prompt. Here's how it works:
| Action | Approval Needed? | Why |
|---|---|---|
| Answering a question | ❌ No | Nothing changes on your system |
| Reading a file | ❌ No (within your current directory) | Read-only — safe |
| Listing files or folders | ❌ No | Read-only |
| Creating a new file | ✅ Yes | Creates something new on disk |
| Editing an existing file | ✅ Yes | Modifies your data |
| Deleting a file or folder | ✅ Always yes | Destructive — can't easily undo |
| Running a system command | ✅ Usually yes | Depends on the command's risk level |
| Installing software | ✅ Yes | Changes your system |
Directory Access — Where Copilot Can See
By default, Copilot can only access files in your current working directory (the folder you're in). It can't see files outside that folder unless you grant access.
Think of it like rooms and keys in a building:
| Concept | Analogy |
|---|---|
| Your current directory | The room you're standing in — Copilot can see everything here |
| Other directories | Locked rooms — Copilot can't enter without a key |
/add-dir |
Handing Copilot a key to another room |
To give Copilot access to an additional folder:
Now Copilot can read and work with files in that folder too.
Be specific with /add-dir
Don't give access to your entire C: drive. Grant access only to the specific folders you need. It's like giving a spare key to one room, not a master key to the entire building.
/allow-all and /reset-allowed-tools
For advanced users, there are two power commands:
| Command | What It Does | Analogy | Caution Level |
|---|---|---|---|
/allow-all |
Stops asking for permission — trusts all actions | Giving the master key | ⚠️ Use for short bursts of trusted work only |
/reset-allowed-tools |
Revokes all permissions — goes back to asking | Changing the locks | ✅ Use after /allow-all to restore safety |
Recommended workflow:
/allow-all         → Do a batch of trusted work
                   → Copilot runs freely without asking
/reset-allowed-tools → Done? Revoke permissions
                   → Back to normal safety mode
What Copilot Can NEVER Do
No matter what, Copilot cannot:
| Limitation | Why |
|---|---|
| ❌ Bypass Windows permissions | If your Windows account can't do it, Copilot can't either |
| ❌ Access other computers | It only runs on your machine |
| ❌ Override your "no" | If you deny an action, it stops completely |
| ❌ Run hidden commands | Everything it does is shown to you |
| ❌ Access your camera/microphone | It's text-only |
| ❌ Share your data externally | Conversations are private |
✅ Module 14 Checkpoint
- [x] 4 safety layers: content filters → model training → tool permissions → your approval
- [x] Approval prompt:
y(allow),a(allow all),n(deny) - [x] Always read commands before approving
- [x] Copilot can only access your current directory by default — use
/add-dirfor more - [x]
/allow-allfor trusted bursts,/reset-allowed-toolsto restore safety - [x] Copilot can never bypass Windows permissions or override your "no"
Module 15: Referencing Files with @
One of Copilot CLI's most useful features is the ability to show it a specific file so it can read and understand the contents. This is done with the @ symbol.
📑 In This Module
How @ Works
Instead of trying to describe a file's contents in words, you can hand it directly to Copilot:
This is like handing a document to your colleague instead of trying to describe it over the phone. Copilot reads the file directly and gives you precise, contextual answers.
When to Use @
| Scenario | Without @ |
With @ |
|---|---|---|
| Understanding a config file | "I have a JSON file with some settings, let me paste them..." | @config.json explain each setting |
| Debugging an error log | "I got an error that says..." (copies 50 lines) | @error.log what went wrong? |
| Reviewing a script | "I wrote a script, here's the code..." | @backup-script.ps1 review this and suggest improvements |
| Comparing files | Copy-paste both files into the chat | @file1.json @file2.json what's different? |
How to Use @ — Step by Step
- Start typing
@in your prompt - A dropdown appears showing files in your current directory
- Select a file (or type the filename)
- Continue your prompt after the filename
Examples:
You can reference multiple files
Use @ multiple times in a single prompt to reference multiple files. Copilot can read and compare them simultaneously.
What File Types Can Copilot Read?
| File Type | Can Copilot Read It? | Examples |
|---|---|---|
| Text files | ✅ Yes — perfectly | .txt, .md, .log, .csv |
| Code files | ✅ Yes — perfectly | .ps1, .py, .js, .json, .xml, .yaml |
| Config files | ✅ Yes — perfectly | .json, .yml, .toml, .ini, .env |
| Office documents | ⚠️ With skills/plugins | .docx, .xlsx (needs data-ai-toolkit or similar) |
| PDFs | ⚠️ With skills/plugins | .pdf (needs pdf skill) |
| Images | ❌ No — can't interpret visual content | .png, .jpg, .webp |
| Videos/Audio | ❌ No | .mp4, .mp3 |
| Binary files | ❌ No — just gibberish | .exe, .dll, .zip |
✅ Module 15 Checkpoint
- [x]
@filenameshows a file directly to Copilot for precise answers - [x] Much better than copy-pasting — Copilot reads the actual file
- [x] You can reference multiple files in one prompt
- [x] Works great with text, code, config, and log files
- [x] Office docs and PDFs need special skills/plugins
Module 16: Skills, Plugins & MCP Servers
So far, Copilot CLI has been working with your local machine — files, commands, system info. But it can do much more. Through skills, plugins, and MCP servers, Copilot can connect to cloud services, external tools, and live data sources.
📑 In This Module
The Phone Apps Analogy
Think of Copilot CLI as a smartphone:
| Smartphone Concept | Copilot CLI Equivalent |
|---|---|
| Pre-installed apps (Camera, Calendar) | Skills — built-in capabilities, always available |
| Apps you download from the App Store | Plugins — add-on features you can enable |
| Background services (GPS, cellular, cloud sync) | MCP Servers — live connections running behind the scenes |
Skills — Built-In Capabilities
Skills are like apps that come pre-installed on your phone. They're always there, ready to use:
| Skill | What It Does |
|---|---|
| Azure Deploy | Deploy apps to Azure, manage infrastructure |
| Security Scanner | Scan for vulnerabilities and exposed secrets |
| Data & AI Toolkit | Data analysis, ML model evaluation |
| PDF / XLSX | Read and process Office documents |
| Web Search | Search the internet for current information |
See all available skills:
Plugins — Add-On Features
Plugins are like apps you download from the store. They extend what Copilot can do:
- Some are built by GitHub
- Some are built by Microsoft
- Some are built by third-party developers
Manage plugins with:
MCP Servers — Live Cloud Connections
MCP (Model Context Protocol) servers are the most powerful extension. They're live connections to external services that let Copilot interact with real data:
| MCP Server | What It Enables |
|---|---|
| Azure | List VMs, manage resources, check costs, deploy apps |
| M365 / WorkIQ | Read emails, search SharePoint, check Teams messages |
| GitHub | Search repos, create issues, review PRs, manage workflows |
| Databases | Query SQL databases, manage data |
When an MCP server is connected, you can ask questions like:
Manage MCP connections:
How They All Work Together
┌──────────────────────────────────────────────────┐
│                 COPILOT CLI                       │
│                                                   │
│  ┌─────────┐  ┌─────────┐  ┌──────────────────┐ │
│  │ Skills  │  │ Plugins │  │   MCP Servers    │ │
│  │ (built  │  │ (add-on │  │  (live cloud     │ │
│  │  in)    │  │  apps)  │  │   connections)   │ │
│  └────┬────┘  └────┬────┘  └────────┬─────────┘ │
│       │            │                │            │
│       ▼            ▼                ▼            │
│  ┌─────────────────────────────────────────────┐ │
│  │     Your questions + AI intelligence         │ │
│  └─────────────────────────────────────────────┘ │
└──────────────────────────────────────────────────┘
         │              │              │
         ▼              ▼              ▼
    Local files    External APIs   Cloud Services
    & commands     & tools         (Azure, M365,
                                    GitHub, DBs)
A Brief Note on Agents
As you get more advanced, you'll encounter agents — specialised AI workers that Copilot can deploy for complex tasks. Think of them like this:
Copilot is the head chef in the kitchen. For complex orders, the head chef assigns tasks to sous chefs (agents) — each specialising in a different area:
- Explore agent — quickly searches and understands codebases
- Task agent — runs builds, tests, and deployments
- Code review agent — reviews changes for bugs and security issues
- General-purpose agent — handles complex multi-step tasks
You don't need to know the details now — just know that Copilot can bring in specialists when the job calls for it.
✅ Module 16 Checkpoint
- [x] Skills = built-in capabilities (always available)
- [x] Plugins = add-on features you can enable
- [x] MCP Servers = live connections to Azure, M365, GitHub, databases
- [x] Manage with
/skills,/plugin,/mcp - [x] Agents are specialised workers Copilot can deploy for complex tasks
- [x] Together, these turn Copilot CLI from a local tool into a cloud-connected powerhouse
Module 17: Putting It All Together — Alex's Daily Workflow
Let's return to Alex — our IT admin from the beginning. After completing this study guide, here's how Alex's typical day looks with Copilot CLI.
📑 In This Module
Module 17: Putting It All Together
├── Alex's Morning Routine
├── Real Scenario 1: Check System Health
├── Real Scenario 2: Azure VM Management
├── Real Scenario 3: Find and Clean Up Large Files
├── Real Scenario 4: Create a PowerShell Script
├── Before and After: Alex's Transformation
├── Alex's End-of-Day Routine
└── Alex's Reflection
Alex's Morning Routine
7:30 AM — Alex opens Windows Terminal

> copilot

7:31 AM — Copilot loads Alex's custom instructions automatically
  (Name, role, timezone, preferences — the Passport Strategy)

> /model
  → Selects Claude Opus 4.6 for the morning's complex work

> /rename Morning IT tasks - April 1
Real Scenario 1: Check System Health
Alex's first task every morning — check if anything needs attention:
> How much free disk space do I have on all drives?

> Are there any Windows services that have stopped unexpectedly?

> What are the top 10 processes using the most CPU right now?
In 30 seconds, Alex has a system health check that would have taken 5-10 minutes of clicking through GUI panels.
Real Scenario 2: Azure VM Management
Alex gets a request to check on the company's Azure VMs:
> List all Azure VMs in our subscription. Show me which ones are
  running, which are stopped, and how much each costs per month.
Copilot connects to Azure via the MCP server, queries the VMs, and presents a clean table. Alex can then:
Copilot shows the command, Alex approves, and 12 VMs are stopped in seconds.
Real Scenario 3: Find and Clean Up Large Files
Alex notices the Downloads folder is getting huge:
> Find all files in my Downloads folder larger than 100MB.
  Show the filename, size, and when it was last accessed.
Copilot lists them. Alex reviews and says:
> Delete the ones that haven't been accessed in more than 60 days.
  But show me the list first before deleting.
Copilot shows the list, Alex approves, space is freed.
Real Scenario 4: Create a PowerShell Script
Alex needs a script that runs weekly:
> Create a PowerShell script that:
  1. Checks disk space on all drives
  2. Finds drives with less than 10% free space
  3. Exports the results to a CSV file with today's date
  4. Explain each part of the script with comments
Copilot writes the script, explains each section, saves it, and offers to test it.
Before and After: Alex's Transformation
| Task | Before (GUI) | After (Copilot CLI) |
|---|---|---|
| Check disk space on 5 servers | Open each server → Storage panel → write down numbers (10 min) | One question, instant table (10 sec) |
| Disable 50 departing employees | M365 Admin → find each → click block → repeat × 50 (45 min) | One command targeting the group (30 sec) |
| Find large files in Downloads | File Explorer → sort by size → scroll → right-click delete (5 min) | One question + one approval (20 sec) |
| Check Azure VM costs | Azure Portal → each VM → Cost analysis (15 min) | One question (15 sec) |
| Write a monitoring script | Google the commands → Stack Overflow → trial and error (60 min) | Describe what you want → script created (2 min) |
Alex's End-of-Day Routine
4:55 PM — Before closing up:

> /compact
  (Summarise the session in case Alex resumes tomorrow)

> /rename April 1 - VM cleanup and monitoring script

> /exit
  Session saved ✅
Alex's Reflection
"A month ago, I thought the terminal was only for developers. Now it's the first thing I open in the morning. I haven't stopped using GUIs entirely — I still browse the Azure Portal when I'm exploring something new. But for getting things done? Copilot CLI is twice as fast and ten times more powerful. I wish I'd started sooner."
⭐ Bonus Module 18: Work IQ — Your Workplace Intelligence Assistant
Why a Bonus Module?
This module covers Work IQ — a powerful skill that connects Copilot CLI to your Microsoft 365 data. It's included as a bonus because it requires a Microsoft 365 Copilot license, which not everyone has. If you do have it, this module will transform how you interact with your workplace data.
This module also works as a standalone guide — if you're already comfortable with Copilot CLI and just want to learn about Work IQ, you can start here.
📑 In This Module
⭐ Bonus Module 18: Work IQ
├── What is Work IQ?
├── The Problem Work IQ Solves
├── Prerequisites for Work IQ
├── How Work IQ Connects
├── Setting Up Work IQ
│   ├── Admin Setup (Tenant-Level)
│   └── User Setup (Your Level)
├── What Can You Ask Work IQ?
├── Real Scenario: Alex Uses Work IQ
├── Privacy & Security
├── Work IQ vs Opening the Apps
├── Tips & Best Practices
├── Limitations
└── ✅ Checkpoint
What is Work IQ?
Work IQ is a skill inside Copilot CLI that connects directly to Microsoft 365 Copilot — giving you access to your workplace data right from the terminal. No need to switch between Outlook, Teams, SharePoint, and Calendar. Just ask.
Think of it this way:
Without Work IQ: You need to open 5 different apps to find information:
- Open Outlook to check emails
- Open Teams to read channel messages
- Open SharePoint to find documents
- Open Calendar to check meetings
- Open OneDrive to find files
With Work IQ: You stay in the terminal and ask:
"What did Sarah email me about the project deadline?"
One tool. One question. Instant answer.
The Problem Work IQ Solves
As an IT professional, you spend a significant amount of time context switching — jumping between applications to find information:
┌──────────────────────────────────────────────────┐
│              WITHOUT WORK IQ                      │
│                                                   │
│  Need to check an email?     → Open Outlook       │
│  Need meeting notes?         → Open Teams          │
│  Need a document?            → Open SharePoint     │
│  Need someone's info?        → Open Entra/AD       │
│  Need calendar details?      → Open Calendar       │
│                                                   │
│  5 apps. 5 context switches. 5 interruptions.     │
│  😩                                               │
└──────────────────────────────────────────────────┘

┌──────────────────────────────────────────────────┐
│              WITH WORK IQ                         │
│                                                   │
│  Need to check an email?     → Ask in terminal    │
│  Need meeting notes?         → Ask in terminal    │
│  Need a document?            → Ask in terminal    │
│  Need someone's info?        → Ask in terminal    │
│  Need calendar details?      → Ask in terminal    │
│                                                   │
│  1 tool. Stay in flow. Zero context switching.    │
│  😊                                               │
└──────────────────────────────────────────────────┘
Prerequisites for Work IQ
| # | Requirement | Notes |
|---|---|---|
| 1 | Microsoft 365 Copilot license | This is the paid M365 Copilot — not the free Bing/Edge Copilot |
| 2 | Copilot CLI installed and working | Modules 1-4 of this guide |
| 3 | Organisational account (work/school) | Work IQ connects to YOUR M365 tenant — personal accounts won't work |
| 4 | EULA acceptance | One-time consent required before first use |
M365 Copilot license required
Work IQ requires a Microsoft 365 Copilot license (the enterprise AI add-on, typically $30/user/month). This is different from the GitHub Copilot subscription you use for Copilot CLI. If your organisation hasn't licensed M365 Copilot, Work IQ won't be available.
How Work IQ Connects
Here's what happens behind the scenes when you ask Work IQ a question:
sequenceDiagram
    participant You
    participant CLI as Copilot CLI<br/>(your terminal)
    participant WIQ as Work IQ Skill
    participant M365 as Microsoft 365<br/>Copilot
    participant Data as Your M365 Data<br/>(Outlook, Teams,<br/>SharePoint, Calendar)

    You->>CLI: "What emails did I get from Sarah today?"
    CLI->>WIQ: Invokes Work IQ skill
    WIQ->>M365: Sends query to M365 Copilot
    M365->>Data: Searches your Outlook inbox
    Data-->>M365: Returns matching emails
    M365-->>WIQ: AI-processed summary
    WIQ-->>CLI: Formatted response
    CLI-->>You: "Sarah sent you 2 emails today..."
Key point: Your data never leaves Microsoft's cloud. Work IQ queries M365 Copilot, which queries your data within your tenant's security boundary. Copilot CLI just displays the results.
Setting Up Work IQ
Work IQ requires two levels of setup — one by your IT admin (tenant-level), and one by you (user-level).
🔧 Admin Setup — Tenant-Level (One-Time)
This section is for IT Admins / Tenant Administrators
If you're NOT a tenant admin, share this section with your admin. They need to do this ONCE for your entire organisation.
Before anyone in your organisation can use Work IQ, a tenant administrator must grant admin consent — essentially registering the Work IQ app in your Azure tenant and approving the permissions it needs.
Required Admin Roles (you need ONE of these):
| Role | Can Grant Consent? |
|---|---|
| Global Administrator | ✅ Full privileges |
| Privileged Role Administrator | ✅ Can grant for any permission |
| Cloud Application Administrator | ✅ Can grant for most permissions |
| Application Administrator | ✅ Can grant for most permissions |
Step 1: Grant Admin Consent
The quickest way — open this URL in your browser (replace {your-tenant-id} with your actual tenant ID or domain):
https://login.microsoftonline.com/{your-tenant-id}/adminconsent?client_id=ba081686-5d24-4bc6-a0d6-d034ecffed87
Finding your Tenant ID
- Go to entra.microsoft.com → Overview → Tenant ID is displayed on the page
- Or use your domain name directly: e.g.,
contoso.onmicrosoft.com
Sign in with your admin account, review the permissions, and click Accept.
What Permissions Does Work IQ Need?
When you grant consent, you're approving these delegated permissions (user-scoped, not application-level):
| Permission | What It Allows | Why Work IQ Needs It |
|---|---|---|
Sites.Read.All |
Read SharePoint site collections | Query documents and SharePoint content |
Mail.Read |
Read user's mail | Search and summarise emails |
People.Read.All |
Read people lists | Find colleague info and org structure |
OnlineMeetingTranscript.Read.All |
Read meeting transcripts | Summarise what was discussed in meetings |
Chat.Read |
Read chat messages | Search Teams 1:1 and group chats |
ChannelMessage.Read.All |
Read channel messages | Search Teams channel discussions |
ExternalItem.Read.All |
Read external items | Access data from Graph connectors |
These are DELEGATED permissions
This means Work IQ can only access data that the signed-in user already has permission to see. It does NOT grant background/daemon access. If a user can't see a SharePoint site in their browser, Work IQ can't see it either.
Step 2: Verify Admin Consent Was Granted
- Go to entra.microsoft.com
- Navigate to Identity → Applications → Enterprise applications
- Find "Work IQ CLI" in the list
- Click Permissions under Security
- All 7 permissions should show "Granted for [Your Organisation]"
Step 3: Assign Copilot Licenses to Users
- Go to admin.microsoft.com
- Navigate to Users → Active users
- Select the users who need Work IQ
- Click Manage product licenses
- Assign Microsoft 365 Copilot license
- Click Save changes
License propagation
Copilot features may take up to 24 hours to appear after license assignment. If a user gets a "license required" error, wait and try again.
Step 4: (Optional) Restrict Access
By default, ALL users with Copilot licenses can use Work IQ. To restrict it:
- In Entra admin center → Enterprise applications → Work IQ CLI
- Go to Properties
- Set Assignment required? to Yes
- Go to Users and groups → Add user/group
- Select only the users/groups who should have access
Alternative: Grant Consent via Entra Admin Center (GUI Method)
If you prefer clicking through the GUI instead of using the consent URL:
- Go to entra.microsoft.com
- Navigate to Identity → Applications → Enterprise applications
- Find Work IQ CLI (it appears after a user attempts to sign in)
- Click Permissions under Security
- Click Grant admin consent for [Your Organisation]
- Review and click Accept
Admin Troubleshooting
| Problem | Cause | Solution |
|---|---|---|
| "Admin approval required" prompt | Admin consent not yet granted | Use the consent URL above or the Entra GUI method |
| "Insufficient permissions" error | Not all 7 permissions were consented | Re-run the consent URL — it will request all permissions |
| Users can't sign in | Conditional Access policy blocking | Review CA policies in Entra → Protection → Conditional Access |
| "License required" error | User doesn't have M365 Copilot license | Assign the license in M365 admin center |
| Features not appearing after licensing | Propagation delay | Wait up to 24 hours |
| Work IQ CLI not in Enterprise apps | No user has attempted sign-in yet | Have one user try to use Work IQ — the app registers automatically |
Copilot Extensibility Settings (M365 Admin Center)
Your tenant may also need Copilot extensibility enabled for agents and plugins:
- Go to admin.microsoft.com
- Navigate to Settings → Copilot (or Copilot in the left nav)
- Under Agents or Extensibility, ensure:
- Third-party plugins/agents are allowed
- Users are permitted to use Copilot extensions
- Under Integrated apps (Settings → Integrated apps), verify Work IQ is not blocked
If your org is strict about plugins
Some organisations block all third-party Copilot extensions by default. If Work IQ doesn't appear even after admin consent, check the Copilot extensibility settings in the M365 Admin Center. You may need to explicitly allow it or add it to the approved apps list.
👤 User Setup — Your Level
Once your admin has completed the steps above, here's what YOU do:
Step 1: Launch Copilot CLI and check if Work IQ is available:
Look for "workiq" in the skills list. If it's there, the skill is loaded.
Step 2: Accept the EULA (first time only)
The first time you use Work IQ, you'll be asked to accept the End User License Agreement. This is a one-time consent.
Step 3: Try your first query
If everything is connected, you'll see your calendar for the day — pulled directly from your M365 account.
What Can You Ask Work IQ?
Work IQ can query six major areas of your Microsoft 365 data. Here's a comprehensive guide with examples for each:
📧 Emails
| What You Want | Example Prompt |
|---|---|
| Recent emails | "What emails did I get today?" |
| Emails from a specific person | "What did Sarah email me about this week?" |
| Emails about a topic | "Find emails about the budget review" |
| Unread emails | "How many unread emails do I have?" |
| Email with attachment | "Did anyone send me a spreadsheet this week?" |
| Summarise a thread | "Summarise the email thread about the Azure migration" |
📅 Meetings & Calendar
| What You Want | Example Prompt |
|---|---|
| Today's schedule | "What meetings do I have today?" |
| This week's meetings | "Show me my calendar for this week" |
| Meeting details | "What is the agenda for the 2pm project sync?" |
| Meeting with specific person | "When is my next meeting with David?" |
| Free time | "When am I free this afternoon?" |
| Meeting recap | "What was discussed in yesterday's team standup?" |
📄 Documents & SharePoint
| What You Want | Example Prompt |
|---|---|
| Find a document | "Find the Q4 sales report" |
| Recent documents | "What documents were shared with me this week?" |
| Document by person | "What files did Alex share recently?" |
| SharePoint content | "Search SharePoint for the IT security policy" |
| OneDrive files | "What's in my OneDrive recently modified files?" |
💬 Teams Messages
| What You Want | Example Prompt |
|---|---|
| Channel activity | "What was discussed in the General channel today?" |
| Messages from someone | "What did Michael say in Teams this week?" |
| Topic search | "Find Teams messages about the server outage" |
| Chat messages | "Any messages from my manager today?" |
👥 People & Organisation
| What You Want | Example Prompt |
|---|---|
| Someone's role | "Who is Sarah Chen and what team is she on?" |
| Manager chain | "Who does David report to?" |
| Contact info | "What's the email address for the new IT intern?" |
| Team members | "Who is on the Infrastructure team?" |
| Someone's priorities | "What are Sarah's current priorities based on recent communications?" |
🔍 Cross-Category Queries
These are the most powerful — they pull from multiple sources at once:
| Example Prompt | What Work IQ Does |
|---|---|
| "What's the latest on the Azure migration project?" | Searches emails, Teams, documents, and meetings for anything related |
| "Prepare me for my 2pm meeting with David" | Pulls meeting agenda, recent emails with David, shared documents, and context |
| "What did I miss while I was on leave last week?" | Summarises emails, Teams activity, document changes, and meeting notes |
| "What are the top priorities from my manager this week?" | Analyses emails, meetings, and messages from your manager |
The Power of Natural Language
You don't need to specify WHERE to search. Just describe WHAT you need, and Work IQ figures out which M365 services to query. Saying "What's happening with the budget?" will automatically search across Outlook, Teams, SharePoint, and Calendar for anything budget-related.
Real Scenario: Alex Uses Work IQ
Let's see how Alex from our study guide uses Work IQ during a typical workday:
8:00 AM — Morning triage:
Work IQ scans Alex's inbox and highlights urgent emails, flagged items, and emails from management.8:15 AM — Meeting prep:
> I have a meeting with the infrastructure team at 10am.
  What should I know? Any recent emails or documents related to it?
10:45 AM — After the meeting:
Work IQ reviews the meeting transcript (if available) or recent messages and identifies action items.2:00 PM — Finding information:
Work IQ searches SharePoint and OneDrive for matching documents.4:30 PM — End of day review:
> Summarise what happened today — key emails, meeting outcomes,
  and anything I need to follow up on tomorrow.
Privacy & Security
This is the question everyone in IT asks — and rightly so:
| Concern | Answer |
|---|---|
| Who can see my data? | Only YOU. Work IQ queries YOUR M365 data with YOUR permissions |
| Does data leave Microsoft's cloud? | No — queries go to M365 Copilot, which is within your tenant's security boundary |
| Can my admin see my queries? | Work IQ queries are subject to the same compliance policies as M365 Copilot |
| Can I access other people's data? | No — you can only see data you already have permission to access |
| Is anything stored on my local machine? | Only the displayed responses in your terminal session — not cached permanently |
| What about sensitive documents? | Same access controls as M365 — if you can see it in SharePoint, you can query it through Work IQ |
Work IQ respects your existing permissions
Work IQ doesn't give you access to anything you couldn't already see. If you don't have permission to view a SharePoint site in your browser, Work IQ can't see it either. It's simply a different interface to the same data with the same security boundaries.
Work IQ vs Opening the Apps
| Task | Opening the App | Using Work IQ |
|---|---|---|
| Find an email from last week | Open Outlook → Search → Scroll → Find (2 min) | Ask one question (5 sec) |
| Check meeting agenda | Open Calendar → Find meeting → Click → Read (1 min) | Ask one question (5 sec) |
| Find a shared document | Open SharePoint → Navigate → Search → Open (3 min) | Ask one question (5 sec) |
| Prepare for a meeting | Open 4 apps, cross-reference, take notes (15 min) | One question gets comprehensive brief (10 sec) |
| Daily summary | Check email, Teams, calendar manually (10 min) | One question (10 sec) |
| Total daily savings | ~30-45 minutes per day |
Tips & Best Practices
| # | Tip | Example |
|---|---|---|
| 1 | Be specific about people — use full names | "What did Sarah Chen say?" not "What did Sarah say?" (there might be multiple Sarahs) |
| 2 | Specify time ranges when relevant | "Emails from this week" not just "recent emails" |
| 3 | Ask for summaries when you don't need details | "Summarise the email thread" instead of "Show me all emails" |
| 4 | Combine queries for meeting prep | "Prepare me for the 2pm meeting — agenda, recent context, and documents" |
| 5 | Use it for end-of-day reviews | "What happened today that I need to follow up on tomorrow?" |
| 6 | Don't use Work IQ in your lab tenant | It connects to your real work M365 — only use it with your organisational account |
Limitations
| Limitation | Why | Workaround |
|---|---|---|
| Requires M365 Copilot license | It uses M365 Copilot as the backend | Check with your IT admin about licensing |
| Can't send emails or messages | It's read-only — queries only, no actions | Use Outlook/Teams to respond |
| Can't modify documents | Read-only access | Open the document directly to edit |
| May not have meeting transcripts | Depends on whether transcription was enabled | Ask attendees or check the recording |
| Accuracy depends on data quality | If data isn't in M365, Work IQ can't find it | Ensure teams use M365 tools consistently |
| Personal accounts not supported | Work IQ needs an organisational M365 tenant | Must use work/school account |
✅ Bonus Module 18 Checkpoint
- [x] Work IQ connects Copilot CLI to your Microsoft 365 data (Outlook, Teams, SharePoint, Calendar)
- [x] It requires a Microsoft 365 Copilot license (separate from GitHub Copilot)
- [x] You can query emails, meetings, documents, Teams messages, and people — all from the terminal
- [x] Your data stays within Microsoft's cloud — Work IQ respects your existing permissions
- [x] Natural language queries work across all M365 sources simultaneously
- [x] Read-only — Work IQ can search and summarise but can't send emails or modify documents
- [x] Saves ~30-45 minutes per day by eliminating context switching between apps
📝 Summary — What You've Learned
Congratulations! You've completed the GitHub Copilot CLI Beginner Study Guide. Here's everything you now know:
| Module | Key Takeaway |
|---|---|
| 1. What is a Terminal? | GUI = clicking, CLI = typing. CLI is faster for repetitive tasks |
| 2. What is Copilot CLI? | An AI on Floor 3 that translates English into commands |
| 3. vs ChatGPT | ChatGPT can TALK — Copilot CLI can TALK and DO |
| 4. Installation | winget install GitHub.Copilot (Windows) or brew install copilot-cli (Mac) |
| 5. First Conversation | Type English → Copilot translates → PowerShell runs → result appears |
| 6. Navigation | 5 commands: pwd, ls, cd, cd .., cd ~ |
| 7. Plain English | Specific prompts get better results. Use magic phrases |
| 8. Slash Commands | /help, /model, /resume, /compact + ! prefix for direct commands |
| 9. Sessions | Like phone calls — temporary but resumable |
| 10. Passport Strategy | Custom instructions = permanent identity loaded every session |
| 11. Context Window | Shared whiteboard — manage with /compact, /clear, /new |
| 12. Models | Different brains, different costs. Opus = best, Haiku = cheapest |
| 13. Budget | Premium requests are your monthly AI currency. Mix models wisely |
| 14. Safety | 4 protection layers. Always read before approving |
| 15. File References | @filename shows files directly to Copilot |
| 16. Skills & MCP | Connect to Azure, M365, GitHub — cloud-powered superpowers |
| ⭐ 18. Work IQ | Query emails, meetings, documents & Teams — all from the terminal |
| 17. Putting It Together | Copilot CLI transforms your daily IT workflow |
🔑 Key Commands — Quick Reference
| Command | Purpose |
|---|---|
copilot |
Launch Copilot CLI |
/help |
Show all available commands |
/model |
Switch AI model |
/usage |
Check remaining premium requests |
/resume |
Return to a previous session |
/rename |
Name your current session |
/compact |
Summarise conversation (save memory) |
/clear |
Reset the conversation |
/new |
Start a fresh session |
/exit |
End the session |
/context |
Check whiteboard usage |
/skills |
List available skills |
/plugin |
Manage plugins |
/mcp |
Manage MCP server connections |
/add-dir |
Grant access to additional folders |
/diff |
Show file changes Copilot made |
/rewind |
Undo Copilot's last action |
!command |
Run a shell command directly (bypass Copilot) |
@filename |
Show a file to Copilot |
🚀 Recommended Next Steps
Now that you have the foundations, here's where to go next:
| # | What to Learn | Why | Resource |
|---|---|---|---|
| 1 | Practice daily | Muscle memory comes from repetition | Use Copilot CLI for your real work tasks |
| 2 | Set up custom instructions | Every session becomes personalised | Module 10 of this guide |
| 3 | Learn Git basics | Essential for collaboration and version control | Coming soon on this channel |
| 4 | Explore MCP servers | Unlock Azure, M365, and GitHub integration | Coming soon on this channel |
| 5 | Build your first automation script | Experience the real power of CLI | Ask Copilot to help you write one |
💡 Top 5 Tips for Getting Started
- Start simple — Ask Copilot basic questions about your computer. Build confidence before tackling complex tasks.
- Don't memorise commands — That's Copilot's job. You describe the WHAT, it handles the HOW.
- Save everything important — Use the Passport Strategy. Learn it → Save it → Clear → Move on.
- Name your sessions — Future you will thank present you when you need to
/resumesomething from last week. - Mix your models — Haiku for quick stuff, Opus for complex work. Your budget will thank you.
Final Thought
"You don't need to memorise commands. You just need to know what's possible — and then ask Copilot to help you get there. The terminal isn't scary. It's just a different way of talking to your computer — and now you have an AI translator."
📚 Study Guide by A Guide to Cloud & AI Hands-on learning for IT professionals who aren't developers.
Have questions? Leave a comment on the YouTube video or visit aguidetocloud.com.
© 2026 Susanth Sutheesh — A Guide to Cloud & AI. All rights reserved. This study guide is for personal use only. Do not redistribute without permission.